Showing posts with label Solo Gaming. Show all posts

age of eagles computer assisted

Age of Eagles (et al) Computer Assisted

Introduction

In the past few years I spent a lot of time solo-gaming. I found that one of the biggest challenges was sticking to the game sequence. The more complicated the rules the greater the challenge. As a (relatively) competent programmer I wanted to see how I could automate the sequence and take some of the trudge of calculating combat etc. 

The major breakthrough I had was that I, like many other wargamers, allow our fingers to do the walking over the quick reference sheets. Making sure we point to a factor on the sheet to count them. My epiphany is why not do the same on the touchscreen of a computer and then let the computer roll the bones for you.

It is also interesting that using this solution has helped me introduce the game systems to new players. It liberates them from the mechanics of combat calculations and instead seems to place them in the command seat making battlefield decisions on moving and committing their forces to action.

I have tried this a number of times with different rule sets now with varying degrees of success. I think one of the better solutions I have come up with is for Fire and Fury and Col Bill Gray's Age of Eagles rules and the derivatives.

Age of Eagles Solution


This set of pictures are from the Age of Eagles variant, but I have adopted for all of the games on this welcome screen. It helps if you are familiar with the rule system, but I think you will appreciate the effect I am trying to achieve even if you are unfamiliar with the specifics of these rules. 


This is the initial screen where one can set the game scenario features. One can save and load scenarios. I have also added some features to play solo. Basically these allow the player to generate different courses of action, weight them and then computer chooses the plan the commander follows.

 There are a couple of additional features as well to do with doctrine etc but I can cover those in more detail in a later post if people are interested. There are two other features. The first displays the die rolls - a confidence building measure! The second allows the program to manage events such as the arrival of reinforcements etc. I will cover the "Adjust Casualties" button later.

The convention is that for those options, such as combat modifiers, the option is selected when it goes gold as per the display dice rolls selected here.

The Event manager has a number of options for handling random time of arrival, decrementing dice rolls etc. This is all set up before the game starts.

On to the game. I have programmed the application to follow exactly the sequence of play. As with most games the first thing every thing to do is to determine who has the initiative.

Next up in Age of Eagles et al is the First Player's Tactical March Phase

Starting with Reserve Movement. In this case I have selected modifiers for conducting Reserve Movement last time and being disordered. (Other factors might apply but this is just to show the principles!)

By pressing "Check" the computer goes away, rolls the bones, and calculates the answer. Remember that in selecting the modifiers and pressing "Check" it is your finger on the touchscreen that is doing all the work. 

We aren't using a  mouse here! the tablet is as easy to hold and use as a Quick Reference Sheet!

Let's move on the Tactical Movement. In this case I have chosen a number of other options for this unit. A slight difference here is that in order to get the +1 for detached leader one merely has to press the Detached Leader button, or similarly for Attached Leaders or Cover etc. 

And the results are here. Perhaps I should explain the dice rolls showing as [4 + 4] in this example. The first 4 is the D10 die roll, and the +4 are the positive modifiers. 

In Age of Eagles et al it is important to capture the fact that someone is disordered, not because it is a factor but because one looks up the result on a different table. Hence it allows the computer to give you the correct and expected answer.

So onto the Defensive Firing. I won't bother showing the Attackers fire phase as this is identical, so pay attention! 

If you play these rules the form looks very much like the quick reference sheet. It has the range bands across the top, with the weapons down the left and the fire factors for each category weapon where the two intersect. For the artillery the factors are Heavy on the left medium and light on the right.

One then simply calculates the total fire factor at the target and then one uses the slider to register the fire points. Choose the factors and then press "Fire". The Artillery modifier is not really a modifier, it rather ensures that the result relates to artillery and not infantry.

The other wrinkle I have added to help those who need to take of their socks to count to twenty is that I have added a calculator. 

All one has to do is to press a fire factor and the calculator pops up. Simply select the number of elements/models firing at that factor. Use the multiplier if relevant from a half to two times, and then press "Add" and this cumulatively adds the calculator total to the Fire factor.

As suggested the results are very straightforward after pressing "Fire". In this case the computer rolled a 7 and the modifiers were +1. As you can see because we selected firing at Artillery it only shows the effect on artillery.

On to Charge Combat, and where casualties mount; if you get your charge going in correctly and in numbers. So this works in a similar way to the other screens. 

A minor note is that where there is a button and an associated text box such as "Troop Rating", and "Outnumbered", one selects the text and it cycles through in the box to its right the options available. I think the selections are fairly predictable. 

At the bottom it shows the cumulative modifiers for the attacker and defender; another confidence building measure to reassure the players that all is in order and the computer knows as much as they can calculate in their heads. The nice thing is doing it this way it is very difficult to miss factors.

And finally after one has pressed the "Fight the Melee" one gets first the Attacker result.

And then the Defender result. Didn't the Austrians do well!

A final word on the "Adjust Cas" button you have seen throughout. One of the nice features in the game is that once a side has reached 30% losses it starts to suffer a -1 modifier on tactical march for each 5% after that. This means that at 35% losses one suffers an immediate -2 modifier. That means in my experience that as the losses mount it becomes increasingly difficult to maintain the momentum going forward and Brigades start going backwards rather than forwards! In this solution losses are tracked and this figure is calculated by the computer. However, given that losses in the Melee can mount and when their is one element or stand left in a Brigade it departs the field means that one needs a means to adjust the casualties recorded to align with the dead pile next to the table. This table allows for that correlation and adjustment. 

Conclusion

So far I have had good reaction for this tool. It is surprising how intuitive it is given we all stab our fingers through paper quick reference sheets from time to time. In point of fact my Fire and Fury quick reference sheet is now over 30 years old and quite tatty!

If you have any thoughts or questions on this tool then please just let me know. It is only one of a number of these tools I have created for a wide variety of rules.

Bolt Action - Game Report 1

Action in Normandy July 1944 - Solo Game

Introduction

The purpose of this game was to start re-familiarizing myself with the rules, and to have a bit of fun. I don't have two sides in 28mm, so I used my 20mm figures with the ground scale reduced to 20mm to the inch. It makes fighting on a 48" square table the equivalent of fighting on a 60" square table!

I chose the meeting engagement scenario from the rules. However, I did allow the scenario to run on beyond the 6 moves in order to see what would happen and of course to secure the benefit from rules familiarization - as best one can playing solo.

Forces

To make it more balanced I invited my friend Dave to prepare the German plan, and I gave him 3 sample orbats to choose from. He chose the Wehrmacht orbat an understrength infantry platoon, reinforced with a StgIII, an HMG section, a sniper and a Panzerfaust team. 

I fielded an understrength 9 Platoon C Company 1st Bn Duke of Glendons Light Infantry, supported by a Churchill from C Squadron 147th Regt RAC and a FOO, and a Mortar section.

Aerial Photo from Spitfire Recon

This view is an oblique view from the oblique camera on the spitfire recon of the objective from the South

German Plan

General Concept: 
  • To move quickly into position and remain static to engage the enemy as they advance
  • 1st Move all units get to ‘RUN’; this will take the StuG III, PaK38, Sniper and MMG teams into position; PzSchreck into the woods; the others half way to their objective.
  • 2nd Move may require more tactical ‘Adv’ move, but if no enemy contacted / sighted then RUN again into position. 
  • Open fire at close range when the enemy are in the open or moving when possible.
  • Movement: . – See following diagram
  • SNIPER Team to the upper floor of building ‘A’.  Spotting & Sniping on the left flank
  • MMG Team to the upper floor of building ‘B’.  180 arc SW to NE  covering the left flank, the approach down the road and the bocage encl in front of Sec 2
  • 2nd Section – to the enclosure;  LMG & loader on the right in the NE corner; rifles and smg to their left
  • 1st Section – to the wooded are on the hill to the right of 2nd Sec.  Rifles & SMG on the left & within the wood;  LMG & loader on the right, within the wood but able to fire to right flank;  PzFaust to its right, able to fire to the right flank, or move if necessary to cover the left.
  • Pln HQ to follow 2nd section and position outside the enclosure on the reverse slope.
  • THE FALL BACK POSITION for these three units are the woods and wooded hill to their rear.
  • PzSchreck Team to the woods by building B, covering the road and high ground hill ‘U’.  To engage armour only. 
  • PAK 38 to the right of woods to cover the right flank. 
  • StuG III to Building ‘B’, sited to take advantage of the cover of the building, arc covering high ground ‘S’ to ‘X’, the road, woods and enclosure between the two.
Contingency
  • Should the enemy come against the left flank the StuG III and PaK38 can pivot to face 
  • 1st Section to reorientate to face the threat only if the right flank is secure.


British Plan

Battle Report from OC 9 Platoon

1 Sect arrived as planned on time with the Mortar Section


Subsequent recovery of imagery from returning recon flights showed the Germans had already started to deploy. We didn't realise the strength of forces we were fighting.


The FOO had an exceptional good view of the Germans deploying.


However the FOO managed convince his betters that we needed an Uncle Fire Mission, which caused significant causalities on the Germans in the Bocage!


Meanwhile I had to delay our advance as there was significant congestion to our rear and both 2 Sect and the Churchill were very late arriving to join us. Once they arrived we could move forward, however, the delay meant that we could not capitalize on the the success of the artillery fire mission.

Once the advance started it went well, until the closer we got to St Mere le Chappele. The first challenge was that the Germans had posted an HMG in the ruins of the village which supported by a StgIII proved a significant obstacle, and pinned down 1 Sect.


Secondly we were subject to intense and accurate sniper fire from the buildings NW of the village, which cause casualties to 2 Sect and pinned them down.
Our Churchill tank came forward to engage the StgIII. There was a long exchange of fire with the Germans failing to even register a hit of the Churchill. Which seemed unable to secure a hit in return. Until a shot from the StgIII penetrated and destroyed the Churchill.


Whilst we were trying to make some progress, at least our fire support was increasingly accurate and our Mortar section proved extremely effective in suppressing and then driving of the remainder of the German Infantry, who were seen by the FOO moving to their rear.

With the inability to advance and with the threat of the StgIII moving forward to engage 2 Sect, I sent the PIAT team forward. They managed to move to close range and with two shots were able to destroy the StgIII. At which point I decided to withdraw my platoon as we had insufficient strength to secure the village.


Age of Eagles - Game Report 1

Age of Eagles Solo Game - April 1809 Danube Valley somewhere near Regensberg

Introduction

This was my first foray into Age of Eagles (AoE) playing solo. I used my 6mm figures on my 48 inch square table. 

My figure basing isn't as per the rules. My figures are on 25mm frontages rather than the 20mm called for by the rules. Also they are a little less deep. I also wanted to maximize the use of my table and make it as large a maneuver are as I could under the rules. So with a bit of cunning computation I decided that:
  1. Each of my 25mm bases would represent 2 AoE stands. Therefore making 12.5mm of my base equivalent to 3/4inch (20mm) of AoE
  2. Based on that my equivalent of the 1 inch to 120 yds ground scale in AoE would be 17mm to 120yds.
  3. I had pace sticks already marked for 20mm intervals, so I simply decided that I would use a ground scale of 20mm to 120yds.
All of this is approximate enough. Importantly it now means that my 48 inch (1200mm) table is in effect the equivalent to 4.09 miles or 6.5km! Or put another way the size of the battlefield of Waterloo!!!

Report

Candidly it is some time since I fought this battle, and my memory is a little vague. I do recall, however, that at one stage the French were in trouble but managed to rally and cause significant damage on the Austrians!


Bataille Empire - Game Report 8

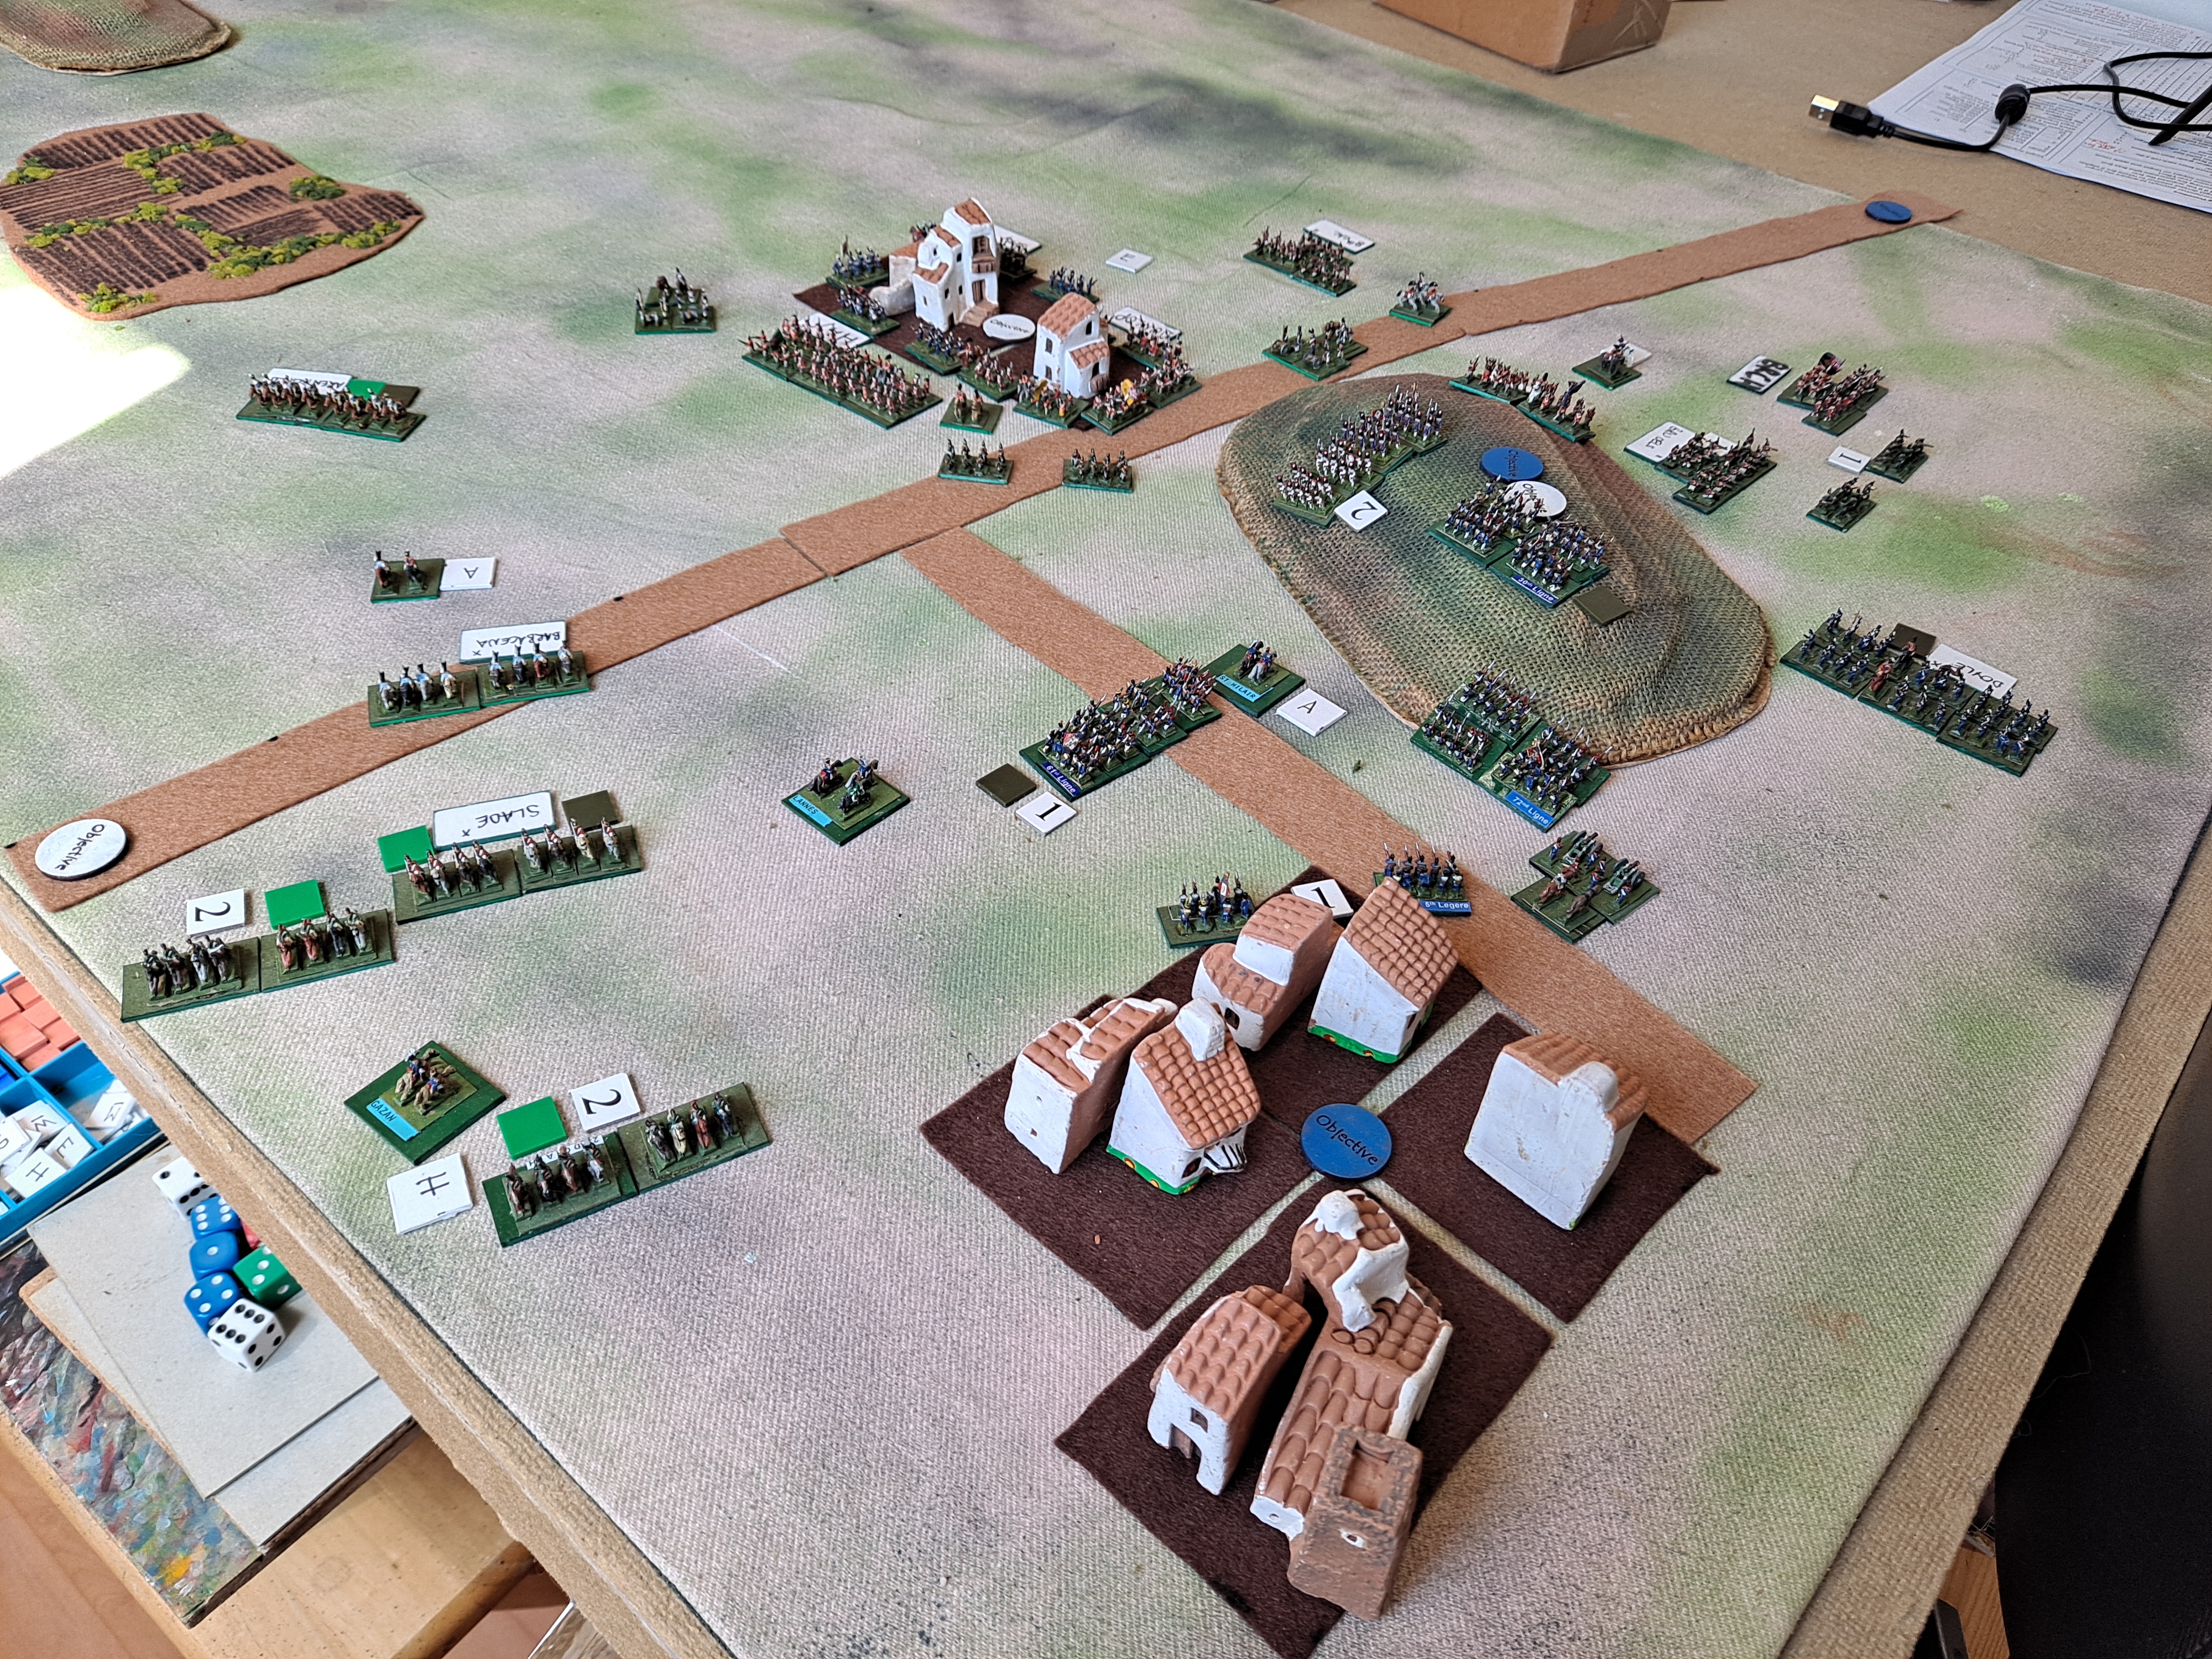
1810 British vs French in the Peninsula - Plan C

Well if you have got this far into my Blog you will now realize that I am really, really trying to find a plan that will allow the French a chance to win!

I thought it was about time that we saw what would happen if the French reinforcements arrived on the left flank of the British.

Initial Set Up - End of Game Turn 2

So with a bit of deja vu we are back at the end of game turn 2 to restart the scenario. Before the British Cavalry Charge and for the hill contest yet again.

I assumed that at the start of Game Turn 3 the French would have rolled for a successful D6 to secure arrival of the flanking force on Game Turn 4 on the French right flank.

Game Turn 3

This time the British Heavy Cavalry again caused the Chasseurs to flee, as did the Light Dragoons . However, this time the Light Dragoons managed to contain their enthusiasm and did not pursue.

The French Light Infantry have again been thrown back in the firefight. However, the French have again secured the hill top. 

Houston's Division has started to react to the likely and imminent arrival of the French forces by turning two small brigades to face their flank while the Light Infantry and the Portuguese Infantry contest the hill.

Game Turn 4

While Slade's Heavy Cavalry Brigade withdraw to regroup the Portuguese Light cavalry complete the destruction of the French Cavalry Division. They start to take fire from skirmishers in the village. 

The French Division attacking the hill has secured control of the top and their other regiments are providing flank protection against Erskine's Division emerging from the village.

The big news is of course the French flanking force has arrived. The exposed Portuguese Line Regiment has fled to the rear. The French launch their attack with two regiments at each of the two British small regiments in line. However, they are not successful and are forced to retreat in the shock combat.

Game Turn 5

The second attack of the French flank attack with the supporting columns has been more successful and both have forced the enemy to retreat.

However on the hill the Converged Grenadiers have suffered more fire and their morale was broken and they retreated. As did the French infantry Regiment supporting the guns.

Cotton's Cavalry are continuing to regroup and starting to advance again.

Game Turn 6

The French Flanking attack continues to gain ground as Houston's Division continues to fall back under pressure. This flanking attack also removes the pressure on the hill, leaving it in the possession of the French. 

Hay's Brigade has taken severe fire, but holds it ground despite taking two casualties.

Cotton's Cavalry Division is still under attack orders and bringing itself into a position to charge the French between the hill and the village.

Given that Plan B went to 6 game turns I decided to finish this a turn early.

This time the result was a Draw!

Lessons Learnt

It seems that if the Flanking Force does arrive then one might actually have a chance of winning.

However, I think on balance that one needs to have at least 4 divisions before one decides to cut a division loose to try a flanking attack!


Bataille Empire - Game Report 7

1810 British vs French in the Peninsula - Plan B

One of the great things about gaming at home is that here in my war room I don't have to rush to pack away the figures. After the last game Dave and I were wondering what the French could have done differently. I decided therefore to see exactly that! I left all the forces as they were. I retained Dave's Battle Plan but came up with a new French Plan. Dave didn't play on line but I gave him the option to amend his orders by email as the game proceeded

Initial Set Up

So what was "Plan B"? Simply put the French Plan B was to send one of the infantry divisions right flanking. The point of effort would be in taking the difficult hill, and we wouldn't worry about the village and its hard cover.

Game Turn 1

As before the British managed to seize the hill. The differences this time were that the French broke the Light Infantry Regiment into detached skirmishers, Ney committed the Converged Grenadiers to support the attack on the hill, and there was no need to garrison the village. 

Meanwhile the right British Infantry Division were exceptionally well commanded and managed to conduct 3 moves to secure the village and occupy it. Cotton’s Cav have come in support on the right.

The French Division launched the attack covered by skirmishers which made it to the top of the hill supported by the Line Columns. In the firefight with the Brunswick Oels skirmishers they suffered an attrition and failed their morale and fled their position leaving the columns exposed.

No sign of the French Flanking Force

Game Turn 2

Wellington’s staff officers failed miserably [2 Command points]. Only the orders to Cotton got through this time, and they have advanced. Erskine's Infantry Division in the centre continues to hold waiting for his order to engage.

Houston’s division were attacked by the French columns and this time the Brunswick skirmishers were thrown off the hill (just). In the ensuing firefight the British light infantry in line in support drove the left French column back, while the right hand French column remains ensconced on the crest of the hill.

No sign of the Flanking force

Game Turn 3

Another successful British cav charge!

In the attack the Slade's heavy cavalry caused one of the French Ch a Ch to flee off the table and they were lost. In their pursuit they came up short of the French column. The Light Dragoons engaged the other Ch a Ch brigade and caused them to retreat.

Erskine’s Division moved out of the village to engage the left flank and rear of the French division attacking the hill.

On the hill the British Light Infantry advanced and gave a punishing volley into the converged grenadiers in column, but they held their ground manfully.. 

There is still no sign of the rest of the French flank force

Game Turn 4

The French infantry still attacking the hill seized the initiative. In doing so they were able to change the orientation and format of their left flank regiment to line and face of against Slade’s Bde and gave them a volley. This caused a loss and Slade’s cav fled behind their supports.

Meanwhile the converged grenadiers seized the hill top throwing the British LI off with losses. However, the French line to their right flank retreated from fire given to them from the foot of the hill from the Brunswick Oels. To make a bad day even worse for the French the converged Grenadiers were fired in the flank from Dunlop’s Bde moving out of the village and also retreated. The hill top was now in vacant possession!

Erskine’s skirmishers advanced against the French skirmishers and threw them back in the firefight with the French fleeing

As for the rest of Cotton’s Division the best to say is that it is regrouping. His command roll was the worst possible (after Wellington used his command points to try and help Cotton seize the initiative) Consequently both the British Cav brigades remained disordered. Cotton’s one command point was used to send the Portuguese Cavalry against the remaining Chassuers, who fled rather than standing to face. However, the Portuguese halted their charge successfully and have regrouped with the rest of Cotton’s division in good order – rather showing the Brits how it should be done.

At the start of Game Turn 5 there is still no sight of the rest of the French forces that should by now be on the battlefield!

Game Turn 5

The French have pulled back of the hill and are cowering around the village they defined as their objective

The British are trying to follow up as best they can. The Portuguese Cavalry in the fore are showing the British Cavalry how the pressure should be maintained on the enemy.

Still no flanking force!

Game Turn 6

The last action of the game was the successful charge of the Portuguese Cavalry to rout the final Chasseur Brigade. 

With no arrival of the flanking force on Game Turn 7 I decided to forgo the pleasure of another game turn. At this stage the British scored a Decisive Victory.

Lessons Learnt

Number one lesson for this game was that a flanking force is not guaranteed to arrive. I crunched the numbers and if you are interested the odds are that if you want to try a flank march the % chance the force will arrive on a particular game turn are shown below. But note that you are rolling the dice when you decide to go flanking as there is an 11% chance that they will never arrive!
Game Turn                    % chance
        2                                    17%
        3                                    28%
        4                                    19%
        5                                    12%
        6                                    8%
        7                                    5%
    Never                                11%

The question is though, what would have happened if they had arrived? Time for a Plan C me thinks?

AOE(BTLF) - Game Report 2

The Battle of Guise 29 Aug 1914

Taken from “Home Before the Leaves Fall” by Ian Senior, pages 139-146

The Actual Battle

This is an interesting battle. In modern cold war doctrinal terms, the French were conducting (even if they didn’t know it or have the intelligence to support it) a counterstroke operation; in other words a counter attack against a moving enemy to destroy the enemy. The British heavy cavalry attack against the flank of D’Erlon’s Corps at Waterloo is also a counterstroke. 

The attack by 35th Div was not conducted with a great deal of urgency. The 69th Res Div attack, however, was far more vigorous, but in the end was beaten back by the power of the German arty. Apparently the Hvy Hows that arrived each fired off over 100 rounds of ammunition! By late morning the 18th(FR) Corps Commander called off the attack, in part to the lack of progress by the Corps on his right flank. The Germans then started to counterattack and in doing so managed to push the French back over to the eastern bank of the River Oise.

Battlefield Design

I thought I would say a few words about the terrain for the battle. I located a BEF 1:100,000 map for the period. This nicely showed the terrain features. I downloaded a segment of the map and printed it and coloured in with highlighter the important contours. This enables one to get a much better picture of the terrain, and especially here the 120m contour line shows the overall flatness of the terrain, but cut with valleys going south and east and north and west.

I then overlaid over this map my available hills to scale to approximate to the ground.


I then added extra layers between the hills to flatten out and join the hills into one main plateau.


I then covered it with my olive cloth, and laid out the villages, first, followed by the main roads in grey and the secondary roads in brown.


The Game

The Rules

I used the Age of Eagles 1914 module for the game with my own adaptations. Further adaptations for this game were:

Reducing Infantry Long Range Fire

I reduced the firepower of infantry between 4 and 12 inches (remembering that 12 inches is over 2000m). I do not believe there is any justification for significant long-range fire effect from infantry. The most that could be achieved from such fire would have been harassing area fire I reduced the Germans to a factor of 1, and the French to 0 (but this increases to a 1 because they had integrated machine guns). If the British had been deployed, then they would be on the same factor as the Germans at this range. Given the weight of shells it therefore would not be unreasonable for these batteries to have a good fire effect against French 75mm batterys.

Heavy Howitzers on table

As with my adaptation for indirect fire I gave each battery a factor of six as they were 155mm howitzers. I also gave them a minimum fire range of 15 inches. 

Initial Setup

This was a significant decision. Where would I deploy the French which surprised the Germans. I decided to place them 12 inches away from MESNIL ST LAURENT deployed for battle. The German were deployed partially in open order to represent picquets, and the entire formation disordered because of the traffic congestion in the village. I decided to leave it to fate, and the initiative dice, to see who would move first – The French got lucky and were the first player!

Doctrinally I decided to employ the French very much as they were used in the early battles of 1914. With bayonet charges against German positions.

0800hrs Game Turn 1(FR first player)

The 35e IR make a timid advance in line of battalions towards MESNIL ST LAURENT. FR Arty fire disrupts BG Winterfeldt causing 2 casualties. GE arty deploys in support of BG Winterfeldt to the W of MESNIL ST LAURENT, with the Heavy How Btys in defilade. BG Hochwachter deploys into open order to defend IRANCOURT and provide flank support to BG Winterfeldt.

0830hrs Game Turn 2 (GE first player)

GE Hvy How silences a 75mm battery, and a further battery is silenced by accurate rifle fire from IRANCOURT. BG Winterfeldt open fire on 35e IR causing a casualty and disordering them, and they are forced to retire. Meanwhile in response 49e IR and 12e IR charge en bayonet in column against MESNIL ST LAURENT in a coup de main attack. 49e IR suffers 3 casualties and flinches and retires from the flanking fire from IRANCOURT. Meanwhile 12e IR on their right flank only take a single casualty and close to contact. In the assault they are beaten back by the Germans, and retire to lick their wounds. The FR arty silence BG Winterfeldt’s MG co.

0900hrs Game Turn 3 (GE first player)

49e IR successfully deploy into open order, despite their losses, to protect the div’s left flank. 12e IR continue to retire. Div Comd brings his reserve, 18e IR, forward to continue the attack. 35e IR successfully regroup but are not committed. FR arty fire falls on MESNIL ST LAURENT causing a cas on BG Winterfeldt. GE fire continues to slow and disorder the FR advance. A FR 75mm Group (Bn) suffers damage and has been silenced.

0930hrs Game Turn 4 (GE first player)

The GE arty has achieved fire dominance and silenced more FR 75mm btys; helped by ammo supplies reaching the Hvy How batterys. MESNIL ST LAURENT suffers more artillery and FR rifle fire with BG Winterfeldt suffering a further 2 cas. 18e IR advance in line and are responsible for some of the casualties in MESNIL ST LAURENT. 49e IR take further losses but hold their ground. 69th Res Div fails to arrive and is now late.

1000hrs Game Turn 5 (GE first player)

69th Res Div arrives and starts to advance on URVILLIERS. BG Winterfeldt abandon MESNIL ST LAURENT, but the 36th Div are oblivious despite the apparent slackening of rifle fire and do not follow up. While they halt and wait orders the 18e IR take punishing fire from the Hvy How and flanking fire from IRANCOURT and lose 2 cas.


1030hrs Game Turn 6 (GE first player)

18e IR retire to regroup, but 12e IR seize the mettle and charge through heavy fire to seize MESNIL ST LAURENT suffering a cas. 69th Res Div advance continues despite traffic jams. BG Winterfeldt retires further from MESNIL ST LAURENT.

1100hrs Game Turn 7 (GE first player)

69th Res Div’s 138e Bde has a breakdown in command and control and fails to continue its advance, with the 287e RIR retiring. In MESNIL ST LAURENT 36th Div’s 12e IR receive punishing fire losing 2 cas and retire from the village. 35e IR also retire. BG Winterfeldt continues its retirement. Hvy How are redeployed to support BG Hochwachter in IRANCOURT from the NE of NEUVILLE ST AMAND. BG Winterfeldt’s arty is silenced and damaged.

1130hrs Game Turn 8 (FR first player)

15 Foot Arty Bn arrives with four 155mm btys and deploys to the NE of NEUVILLE ST AMAND alongside the other 2 How Btys. They open fire on the arty of 69th Res Div which has deployed to support their attack. BG Winterfeldt regroups. 36th Div stabilises its position and its regiments regroup. BG Hochwachter receives fire in IRANCOURT and loses a cas. 138e Bde again has command and control problems again with a regiment withdrawing. 137e Bde continues its advance to the right of 138e Bde.

1200hrs Game Turn 9 (GE first player)

Hvy How fire punishes 69th Res Div arty, damaging two batteries and silencing another. Fire diminishes against IRANCOURT. 69th Res Div’s lead regiments recoil from their attack and fall back. 287e RIR disengages and withdraws from the battle. The 36th Div’s 12e IR are destroyed by fire., with the 49e IR taking a further cas. BG Winterfeldt moves forward to reoccupy MESNIL ST LAURENT.

1230hrs Game Turn 10 (GE first player)

All French forces start falling back. No forward movement from the FR. BG Hochwachter retires from IRANCOURT due to arty fire. BG Winterfeldt reoccupies MESNIL ST LAURENT.


Outcome and Analysis

It is firstly very interesting that the overall outcome was as with the actual battle. Albeit that the Germans lacked the strength to counterattack in any great strength.

The rules once again played well. I think the Age of Eagles use of cohesion levels is very effective at constraining correctly the operations of both sides to the end of the game. This is done through the cumulative effect of losses that gives a negative factor to manoeuvre command dice rolls.

I also think this was balanced by the reduction in infantry firepower I applied at ranges beyond 4 inches. This meant that the longer-range fire combat was solely down to the impact of artillery fire, which again is entirely reasonable and correct.

I have to confess that I rather like these rules and they are starting to give me the flavour of 1914 combat.

French 75mm Group

German 155mm Bty

ADLG - Game Report 334

Arab Indians (135) vs Abbasid Arab (134) For the final battle of the competition I was up against Kevin's Abbasid's. I won the init...