Age of Eagles - Game Report 7

The Second Battle of Landshut 21 April 1809

Background

This is the seventh battle of the campaign, and if not the largest, certainly one of the more significant. And yet again it revisits a battlefield that has already been fought over, LANDSHUT. This is hardly surprising as it provides the bridges and lines of communications over the River ISAR.

Situation

Over the last few days the Austrian 6th Armee Korps had been screening the movement of the French 2nd Corps D’Armee 7km North of LANDSHUT. It became increasingly important that 6th Armee Korps maintained its position given the result of the Battle of ECKMUHL-HEINSPACH. The river crossing at LANDSHUT would be the only way that 3rd Armee Korps and 4th Armee Korps could retire to the East bank of the ISAR. For two days both Korps had been moving South West down the West bank of the ISAR to LANDSHUT. Fortunately, they had broken contact clean and were not being pursued.

On the 20th April 2nd Corps D’Armee, reinforced by two divisions from the 4th Corps D’Armee started a flanking movement to the move on LANDSHUT from the West and seize it. However, this movement was detected by Archduke Charles at HQ Hauptarmee which was co-located with 6th Armee Korps. He immediately started the Korps moving to the South and was able to reassert control over LANDSHUT before 2nd Corps D’Armee were able to arrive. 4th Armee Korps messengers reported to HQ Hauptarmee that both Korps were on route and would be at LANDSHUT by midmorning – 4th Armee Korps were in the lead.

Battlefield Map and Terrain

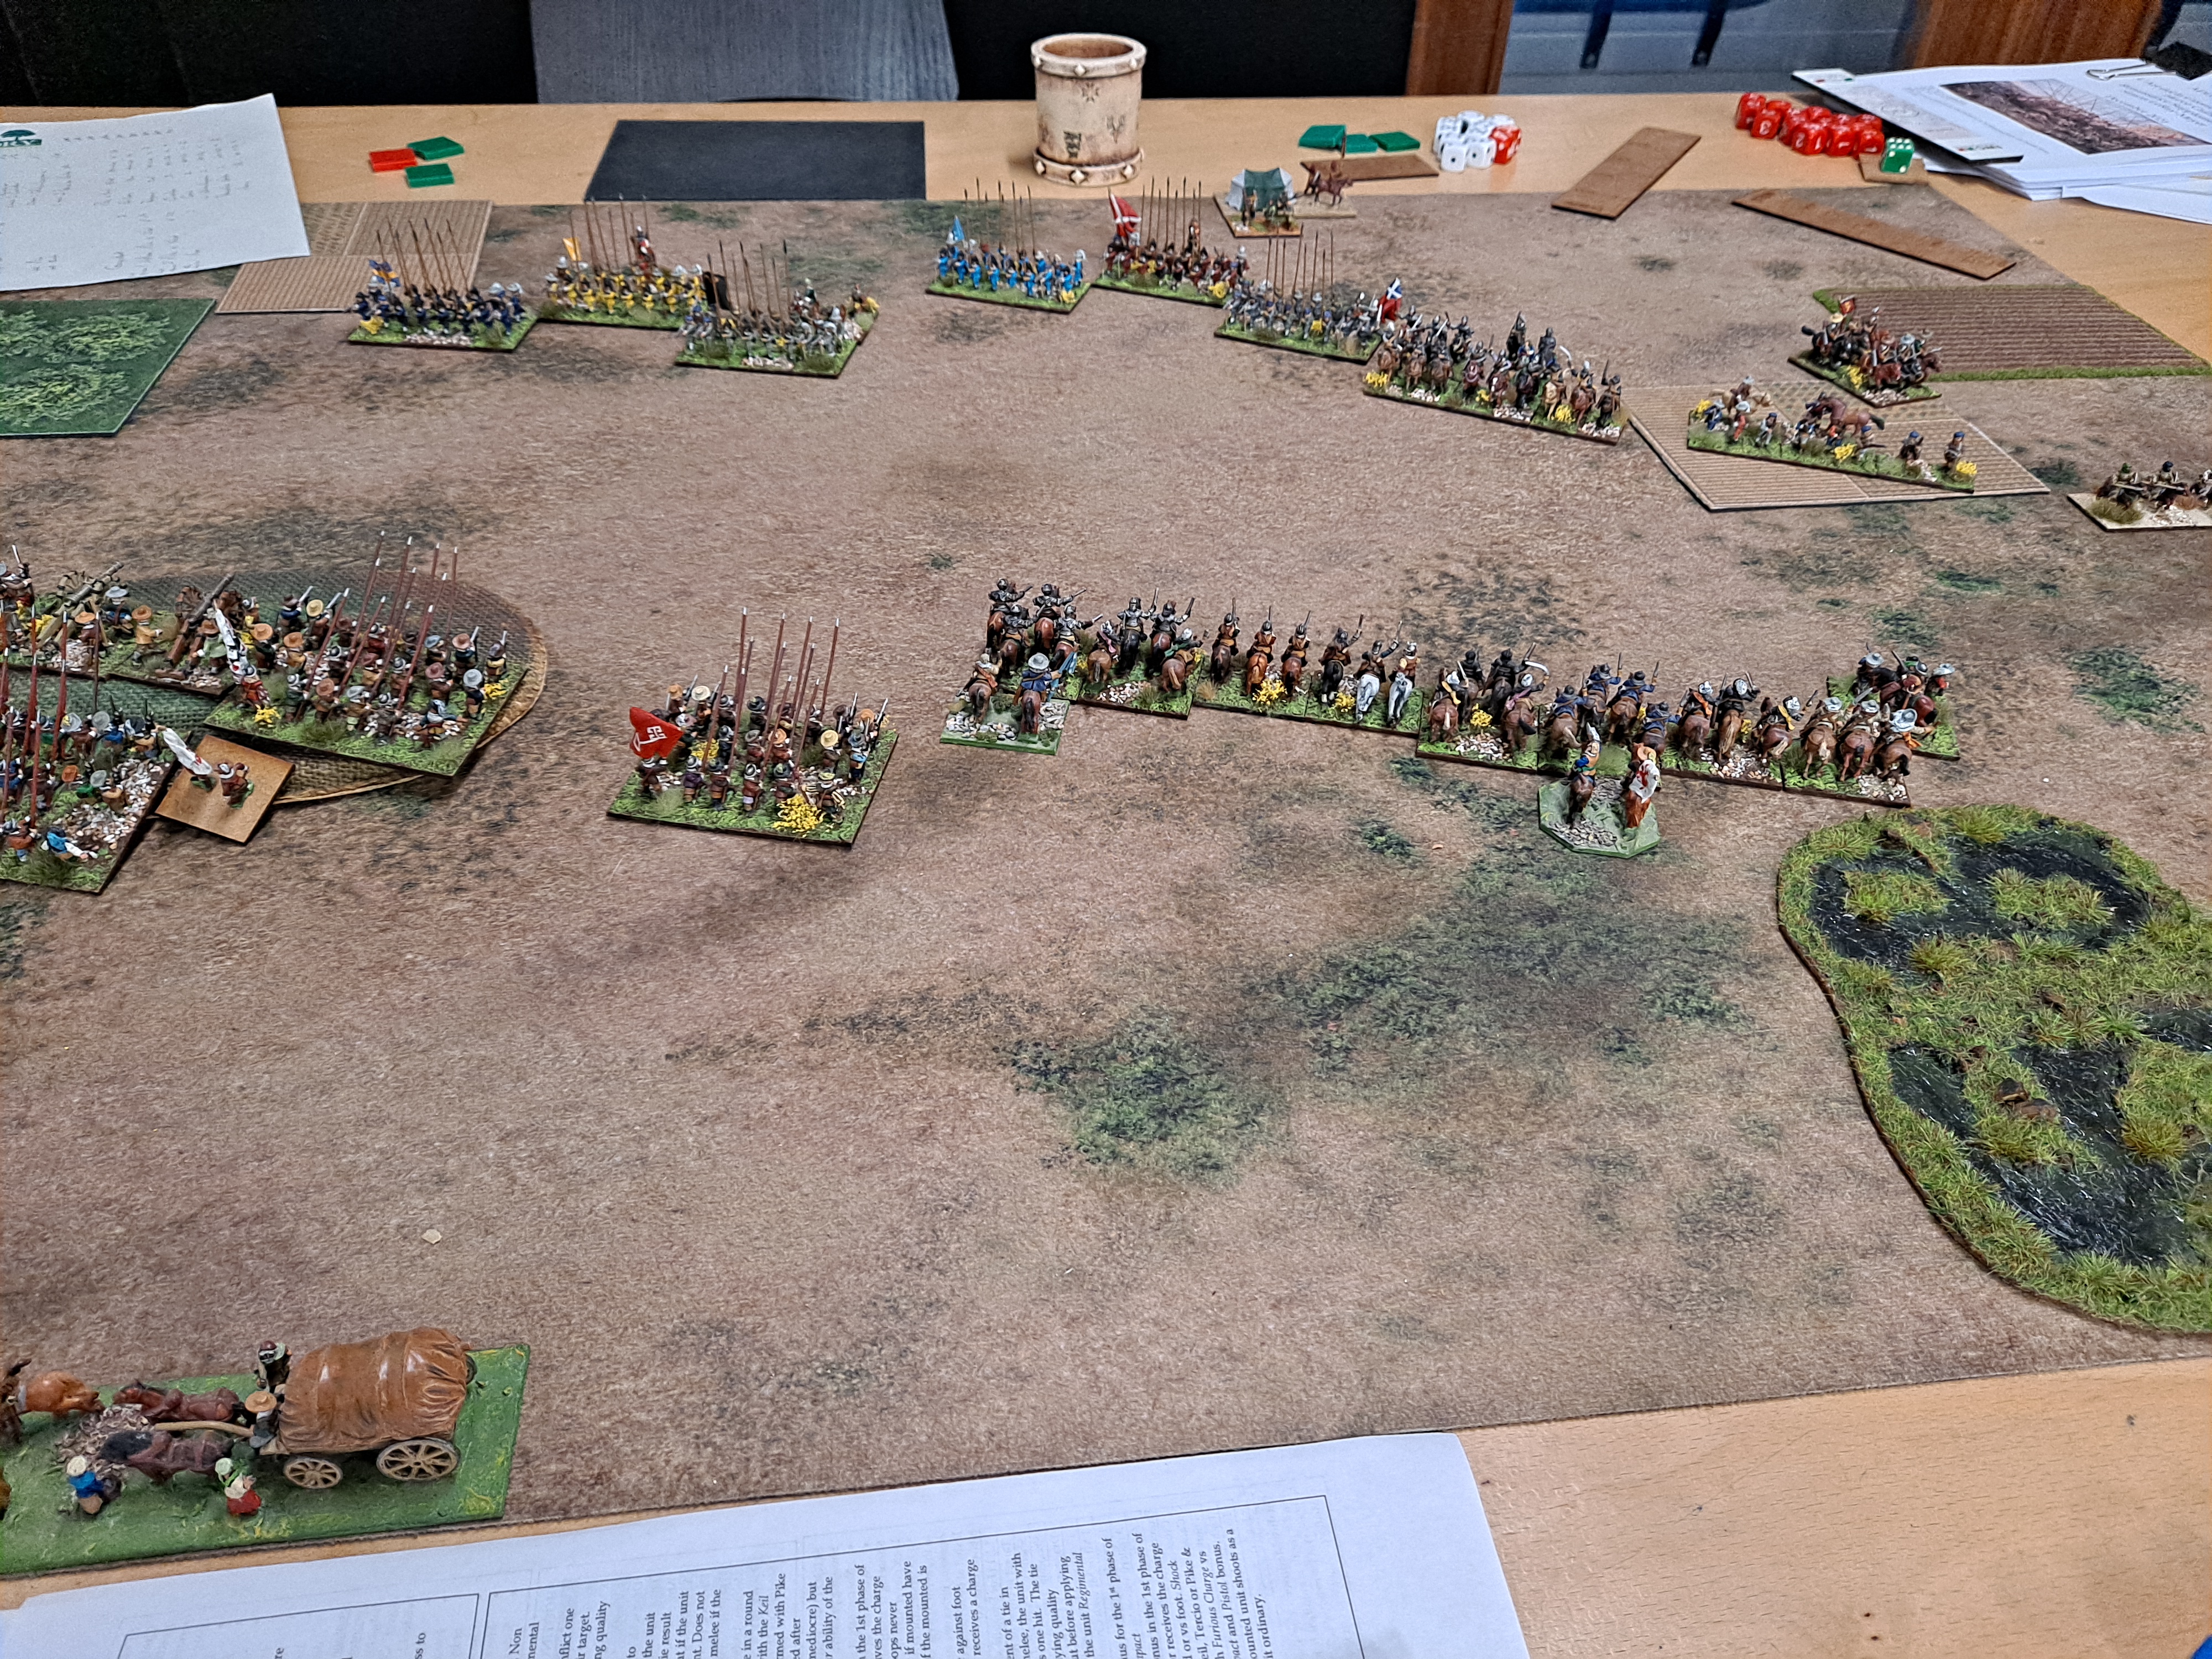
As described previously the ground around LANDSHUT was relatively flat with small woods on the flood plain. The stream was a tributary to the ISAR and because of the recent rains was an obstacle. It was only passable by troops upstream beyond MESSING. The stream split the defensive battlefield in two, further complicating decisions for the Archduke Charles.

Battle Report

6th Armee Korps Commander was ordered to hold LANDSHUT and to establish a secure right flank North of LANDSHUT to allow 4th Armee Korps to arrive unmolested. With those orders he placed his 1st Division in the Front line South of the stream facing West. The Advance Guard Division would be in reserve behind them. 2nd Division were formed North of the stream and were given the mission of securing the woods North West of LANDSHUT as a firm base to protect the arrival of 4th Armee Korps.

With reinforcements from 4th Corps D’Armee the 2nd Corps D’Armee Commander had 4 divisions under command and a Bavarian Light Cavalry Brigade. He split his forces 2 and 2 astride the stream.

The battle opened at 0600hrs with the French making a rapid advance. 1st Division under General Tharreau moved forward with incredible elan, with the intent of using shock and awe to rapidly bounce the Austrians out of position. Brigade Conroux was the first into contact, only for IR4 to throw them back with disdain. The French would now need a more deliberate approach.

IR49, the Austrian right forward regiment suffered 75% casualties by fire by 0700hrs and were withdrawn. Consequently, the Austrian Line started to give ground. Meanwhile GIR6 was send forward to support the 1st Division.

By 0730hrs the French attack is fully committed. If it beaks through then LANDSHUT may fall to the French. However, the Austrians fall back grudgingly giving ground at a price.

On the Austrian right the 2nd Division by 0730hrs has moved forward to secure its objective. Unfortunately, the command and communications arrangements for the divisions from 4th Corps D’Armee were not in place and the left-hand division was far too slow in advancing and therefore unable to support the division to its right as they contacted the Austrians in the wood.

By 1000hrs the French were about to break through onto the Austrian gunline. The 1st Division has been forced back and the Advance Guard has been thrown forward to stabilise the line. This precarious situation was caused by the failure of an Austrian counterattack by IR4 and 14. They were soundly beaten and thrown back with losses by a much weaker French brigade – Brigade Jarry.

This French brigade performed above and beyond what would have been expected of any French line infantry brigade. By the end of the day they would have driven two elite Austrian regiments out of the wood, repulsed the charge of the same opponents when they counterattacked, overran and captured a gun battery and repulsed a cavalry charge – all for no losses to themselves. Nonetheless this proved to be the high-water mark of the French attack.

On the right by 1000hrs the 4th Armee Korps had arrived. Some confusion down the line of march delayed their arrival and their deployment. Throughout this lengthy deployment the French kept a respectable and reasonable distance between them and this new enemy formation, and in doing so endeavoured to extend their line to prevent being out-flanked.

The arrival of the 4th Armee Korps allowed the 6th Armee Korps to recover two regiments from the 2nd Division to reinforce the 1st Division.

By 1030hrs the Austrians were able to start pushing forward West of LANDSHUT. The French had decided that their best chance of securing the town had gone, and were now falling back in good order having inflicted significant damage on the 6th Armee Korps.

North West of LANDSHUT 4th Armee Korps are now almost fully deployed for battle, but the enemy is continuing to give ground and protect its flanks.

By 1100hrs the French were breaking contact and withdrawing West. HQ Hauptarmee called a halt to the battle and started to reorganise its forces to start the withdrawal to the east bank of the ISAR river.

Outcome and Casualties

The French 2nd Corps D’Armee came very close to seizing LANDSHUT. However, it is questionable whether they would have managed to hold it for any length of time with the arrival of the Austrian reinforcements that would have been able in turn to cut of the 2nd Corps D’Armee’s lines of communications.

What the French achieved was in large part due to Brigade Jarry, who would receive a citation and a mention in the Army News of the day.


Bataille Empire - Game Report 10

Austrian 1805 vs Poles 1812

In order to continue the momentum, Adam and I agreed we need to play Bataille Empire as soon as we could reasonably do so. Therefore 3 weeks later we tool to the table again with the Austrians and the Poles. This time I wanted to see the difference if I used 1805 Austrians with battalion guns, I was calling it an experiment! The major changes for my command was to introduce medium sized line infantry regiments with battalion guns, a Grenadier Battalion for each Line Division and to replace the Cuirassier Division with a Dragoon Division.

In the end as you will see I am not sure it was a reasonable experiment, and will need to be repeated. The reason being is that in this battle the Austrians were assaulting the Poles! I was sceptical on my chances of success. With their battalion guns it was very debatable as to how quickly the Austrians would get to attack the Poles before the Polish reinforcements were due to arrive! On the positive side I had at least learnt the value of having supports to fall back behind if pressed hard.

The Polish cavalry Division fought an excellent delaying action that seriously impeded the rate of advance of the Austrian Line Infantry Divisions. They would eventually pay for this endeavour and be driven from the table.

Meanwhile on the left flank the Grenzers made sow progress, with their guns in clearing the wood. The Divisions Hussars were obliged to wait for the wood to be clear before they continued their support of the Grenzers moving forward.

The Austrian Line Divisions made one serious attempt at securing the hill and defeating the Polish Infantry but were pushed back all along the line. Even the Austrian Grenadiers took a pounding, and were forced to disengage and be rallied by the Corps Commander.

Outcome

A marginal victory for the Poles.

Bataille Empie - Game Report 9

Austrians 1809 vs Poles 1812

It had been some considerable time since we last fought Bataille Empire, therefore Adam and I agreed it was time to thumb through the rules together again. Not least because I now had a couple of 15mm armies of the period. Although my Austrians are nominally dressed for 1795 I see no reason why they shouldn’t be used for other dates. Not least because to have period specific dress for the Austrians one would need at least 3 different armies!! With that in mind I decided to field the Austrians as per the 1809 orbats in the Danube.

We both put together a 200 point list. Mine, the Austrians, had 4 divisions; An advance Guard, two line divisions and a Cuirassier Division. Adam had three divisions: two line infantry and one cavalry division. The scenario was an encounter battle, and from the look of the terrain we were going to be fighting for possession of a significant village.

The Austrian Advance Guard arrived at the village first, but the subsequent command factors favoured the Poles who occupied it with one of their line divisions before the Austrians were able to do so.

The next turn the reinforcements arrived. The first Austrian Line Division is moving forward to the attack around the right flank of the village. The Advance Guard Grenzer Regiments have been pushed out of the village with losses. The Corps Commander is, rightly or wrongly supporting the guns!

One of the Grenzer Regiments was forced to retire from the Polish artillery fire. However, on the right flank the Austrian Hussars from the Advance Guard have charged and then destroyed in the pursuit a Polish line infantry regiment. A valuable lesson to both Adam and myself of the value of having supports to fall back behind.

Next game turn the Austrian Cuirassier division arrives and moves forward to threaten the Polish Line Infantry Division.

The Austrian right flank division is advancing to a depth objective, but the Polish artillery has been redeployed to provide flanking fire to disrupt this movement. The right forward Polish Line Division continued its advance to overrun the Austrian Corps Artillery. In doing so it became vulnerable to a counter attack from the arrival of the final Austrian line Division that drove it back.

Meanwhile the Austrian Cuirassier Division has failed to have a significant impact. It has forced a regiment into square, but is now threatened on 3 sides and it doesn’t look good for them. Although we didn’t reach the end of the game, in part due to a lot of page turning to re-familiarise ourselves with the rules, we enjoyed the game. 

Outcome

We were happy to be able to call it a draw at that stage based on the scores at that time. I am sure if we had played on it might have been a Polish win.

ADLG - Game Report 87

German-Tencteri (91) vs Syracusan (50)

There was time for one more game, and Tony offered battle with his Syracusan against my final army – A German Army based on the Tencteri tribe. It is often I manage to bring the Ba-Bas to the table, and the vagaries of how an army of impetuous troops will behave in combat always leads to great excitement!

As I was attacking I wanted as much room for manoeuvre as I could with my army of heavy swordsmen, this would allow them to wield their weapons more effectively! I placed my cavalry command with the elite troops on the left flank.

I refused my right flank to allow my left to come into contact first.

Initial contact was with the cavalry who forced the light infantry to evade and then overran them in their pursuit. As the elite troops made contact they punched holes in the enemy line through the furiousness of their impetuous charge. The Syracusan right flank was broken on the first contact!

In the centre the Germans are faring significantly worse than their peers to their left flank. Even on the German right it is not as promising. The question was how soon the breaking of the Syracusan left would impact the centre.

Although the German centre was crushed by the weight of the hoplites, the German right flank has stabilised and is holding its own. The German left flank is now poised to destroy the enemy camp and sweep down the line.

Outcome

A victory for the Germans by 29 cohesion hits on the Syracusan to 14 on the Germans.

ADLG - Game Report 86

Taifa Kingdoms (204) vs Wars of the Roses (247)

For the second of my battles at our ADLG game day at Entoyment I used the second army I brought to the day, my Andalusian Arab army organised as a Taifa Kingdom army. The great thing about these Andalusian’s is that it can be used in so many different armies. I was a little dubious about time slipping them from the Feudal period to fight Mark’s medieval Lancastrians, but in for a penny in for a pound.

The first saving grace was that I wasn’t against heavy knights, but there were a lot of longbows. For my deployment I kept the cavalry on the wings, with the Christian Knights on my right, and the infantry in the centre. Of course we managed to have blindingly good start with both wing commanders rolling a one for their command roll!. To cap it all on the next turn the right wing commander did the same again. This left no room for doubt that I would be on the defensive.

By this time the infantry had closed up and met in battle in the centre. In which the Taifa troops faired marginally better. On the wings the cavalry on the left are holding back, while the Christian Knights on the right want to get to close enough to charge.

The infantry lines are slugging it out and each side are taking losses. On the left flank The Berber light cavalry have destroyed a Lancastrian light horse and are now both engaging heavy cavalry in a field. The Andalusian heavy cavalry have broken through ready to cause further mayhem. On the right flank the Christian Knights have contacted the Lancastrian heavy cavalry. In the plantation it is a different story. The Christian crossbowmen are fighting for their lives, already 2 cohesion points down.

The Lancastrian infantry line has been thinned out nicely, but on the left the Berber light cavalry engaged in the field were destroyed, but the Lancastrian cavalry lack supports. On the right the Christian Knights fight was indecisive, and the Lancastrians broke off. However, the crossbows are fighting back.

A final push on the left flank destroyed the remaining Lancastrian right flank. In the centre the Taifa infantry and fought and won a significant battle. However, the outstanding performance of the day goes down to the Christian crossbowmen. Despite losing their flank protection and being in mortal danger of being destroyed they overcame their swordsmen opponents and destroyed them!!

Outcome

A victory for the Taifa Kingdom by 27 enemy losses to our 13.

ADLG-R - Game Report 3

Early 30YW Swedish (23) vs Later Imperialists (28)

With many thanks to Tony the local ADLG community met at Entoyment for a day’s gaming. Some of us managed to get 4 games in in the day! I didn’t quite go that far, but I had three great games with great company. First up for me was another opportunity to bring out the 30YW armies for Paul and myself, no change in the armies from our last encounter. However, presentationally there was as I had spent a good couple of evenings finishing the bases and making them presentable.

The best part of the deployment was my gentle hill. Paul used his ‘6’ to move it to his half of the table, and I then rolled a ‘6’ to move it back to where it came from! Other than that, both sides went with a broadly familiar deployment. Albeit that the Imperialists have finally brought their artillery into the front line.

The Swedish forces secured the hill to provide dominating ground for their medium artillery. On the right the opposing cavalry wings move to engage each other.

The Swedish medium cavalry move off to secure the right flank while the dragoons pin down the Imperialist forces in the field. The cavalry is edging closer to starting the cavalry engagement.

The cavalry battle starts with cohesion hits on both sides of the line. The Swedish cavalry have already lost a caracole. Meanwhile the combined firepower of the two Swedish later tercios have inflicted significant cohesion hits on the cornflower blue pike and shot battle unit. As for the lone Swedish battle unit in the foreground he was distracted and sent off on a wild goose chase to protect the camp from Imperialist light infantry!

The Imperialist cavalry have all but one their battle over the Swedes. The battle units continue to trade fire. The Imperialist commanders are managing to rally their battle units quite effectively. Less so the Swedish.

The Imperialist’s have won the firefight on the Swedish left flank, destroying a later tercio battle unit. In the centre the Imperialists elite pike and shot unit is struggling against a later tercio, and is in danger of being destroyed. While their cavalry have broken through the Swedish right flank protection and are now moving towards the Swedish right flank.

Outcome

This time it was an Imperialist victory but 19 cohesion hits were inflicted on the them by the Swedes.

ADLG-R - Game Report 2

Early 30YW Swedish (23) vs Later Imperialists (28)

For our second foray into ADLG-R we again used my troops, but this time I decided to use the Early Swedes. The Imperialists went for a heavy left flank of cavalry, rather outnumbering the Swedes.

Consequently, the Swedish left wing commander moved them right. Whether this was a good idea with the number of Pike and Shot battle units approaching the Swedish left flank was a very serious question.

The Imperialist light infantry stormed the Swedish camp and then moved forward top threaten the rear of the Swedish later tercio battle units. On the right the cavalry combat is currently going the way of the Imperialists.

However, the Swedish cavalry eventually overcame the Imperialists and started to move around the flank., on the left flank the Swedish artillery battery was overran, and the pike and shot battle unit made contact next with a later tercio.

With the Swedish cavalry now breaking through only time would tell how long the rest of the Imperialists would last. The Imperialists light cavalry managed to prevent the Swedes taking the camp and at that point the numbers said that it was a mutual destruction.

Outcome

Our initial assessment of the losses gave us a mutual destruction result, but the canny of you will notice that the later tercio on my right flank has suffered 7 cohesion hits. At the time I was wondering why there wasn’t a 7 chit in my box. It was only when I thought about it later that I realised that it should have been destroyed on 7 losses.

Hence the correct outcome would have been a close fought win for the Imperialists.

ADLG - Game Report 85

Ottoman Empire (267) vs Yuan Empire (279)

I was pleased and grateful to be able to buy one of Clive McLeod’s old ADLG armies and at the time I decided on the Ottoman Empire to fill in a gap in my historiography of armies. Their first outing was against Kevin’s Yuan Chinese; and as expected some interesting allies as well.

As is often the case in my battles I rather messed up the plan and in this case decided to reorientate my army by bringing my infantry over to the left and using my weight of cavalry to try and confront the Chinese cavalry.

Apparently my move caused a bit of concern in the Chinese camp and as a consequence the Light cavalry on the Chinese left were recalled.

The Ottoman infantry command has now shaken out into better formation. The cavalry engagement is about to begin. Albeit that the Chinese’s allied elephant is loitering with considerable intent near the left flank of my cavalry.

I was correct to be concerned about that loitering elephant, it came crashing into the flank of the cavalry, and the Ottoman cavalry are starting to look increasingly fragile. While on the left we are getting the better of the other elephant and its escorts.

Although the Janissaries on the left flank have done well, the bows even better, the Ottoman cavalry has dissolved away.

Outcome

A Chinese win. I will need to think more about the Ottoman army design. The infantry command was much too large.

ADLG - Game Report 138

Seleucid(42) vs Aramean(74) I had time for one quick game, and I now hat Tony is a quick player! So onto battle with a relatively historica...