Experimentation with SpeedPa

Experimentation with Speedpainter 2.0

Background

A couple of years ago I was gifted for Christmas a set of Army Painter Speedpaint. I had a few experiments with it, but candidly I didn't do very much research on how to use it and was not impressed with the results. However, I noticed the release of the new version Speedpainter 2.0 and thought it would be sensible to do some more research on how to use it. 

I set about watching lots of, really very good, You Tube videos on the issue, and a huge thanks to the contributors for their guidance. The only challenge from these videos was that they were painting D&D or Warhammer miniatures which, by my estimation, might not be a good reflection of the outcome on historical miniatures. However, at a recent ADLG community meeting at Entoyment I was talking to Harry, as he whopped me in a game, about his experience and the results he had achieved using contrast painting techniques with the 15mm figures he was using. This was sufficient to convince me that I had to give it a go.

I rushed down stairs to the shop at Entoyment in between games, bought some Speedpainter 2.0 paints and some Deus Vault Arabs and vowed to give it a go, and then share my findings.

Source Videos

There are a lot of YouTube videos on how to use Speedpaint and Contrast paints in the Slap Chop technique. I thought it best to share some of them which give a good idea of the technique and the effects.

The Slapchop Painting Technique Speedpainting Miniatures Fast - This is a good starter for the technique with a rather large D&D figure. Interesting in this one that the base is a sand coloured dry brush rather than grey or white.

Is SLAPCHOP the Future of Speed Painting Warhammer?!  As a comparison with the previous video this is with figures that are comparable with 28mm historical figures.

Drybrushing SECRETS the masters don't teach! - Become Drybrush PRO in 10 minutes Although this is not about Slap Chop it is directly relevant as it is some really good tips about dry brushing which is important before Slap Chopping your figures. Word-to-the-wise, other videos I have watched mentioned using eye makeup brushes, I purchased a couple from The Range, and they are far superior to the Army painter and other dry brushes you can buy!!

Optimized! My Favorite Speedpaint Technique. Finally this video is really good for showing a variety of techniques and the outcome. Highly recommended as you can see from my examples below.

Progress So far

Okay a few pictures of the progress so far.

First up this is the first try and in this you will be able to see a number of differences on the figures based on the degree of dry brushing etc. Specifically the gentlemen on the left on the back rank has significantly less dry brushing on him. With the one in front of him missing some dry brushing on his waist sash.

Here is the rear view. This gives you a better view of the differences in dry brushing versus a white undercoat. The one on the right is the least dry brushing which shows on his spear. The one in the middle has a little more dry brushing, whilst the one to the left was primed in all white, and here I had to add a little more contrast around the sash and sword belt.

This is a front view of the second attempt. for these all have the same degree of dry brush in grey with edges in white. I used bog-standard grey and white from Hobbycraft as this seemed to be the most cost-effective way of getting the paint. The metals are all Speedpainter metallics with a small level of Vallejo metallics as highlights. 

Rear View, and I think the effect is starting to come together nicely, but I will continue to experiment.

This is the third batch, half finished so you can see the depth of grey and then white dry brushing I have applied to a black base coat. Of note the blue coats has been thinned with a 3 parts of Speedpainter thinning medium to 1 part of Speedpainter Raging Sea (Deep Greenish Blue). The deeper colurs can be nicely thinned with the medium to give different effects.

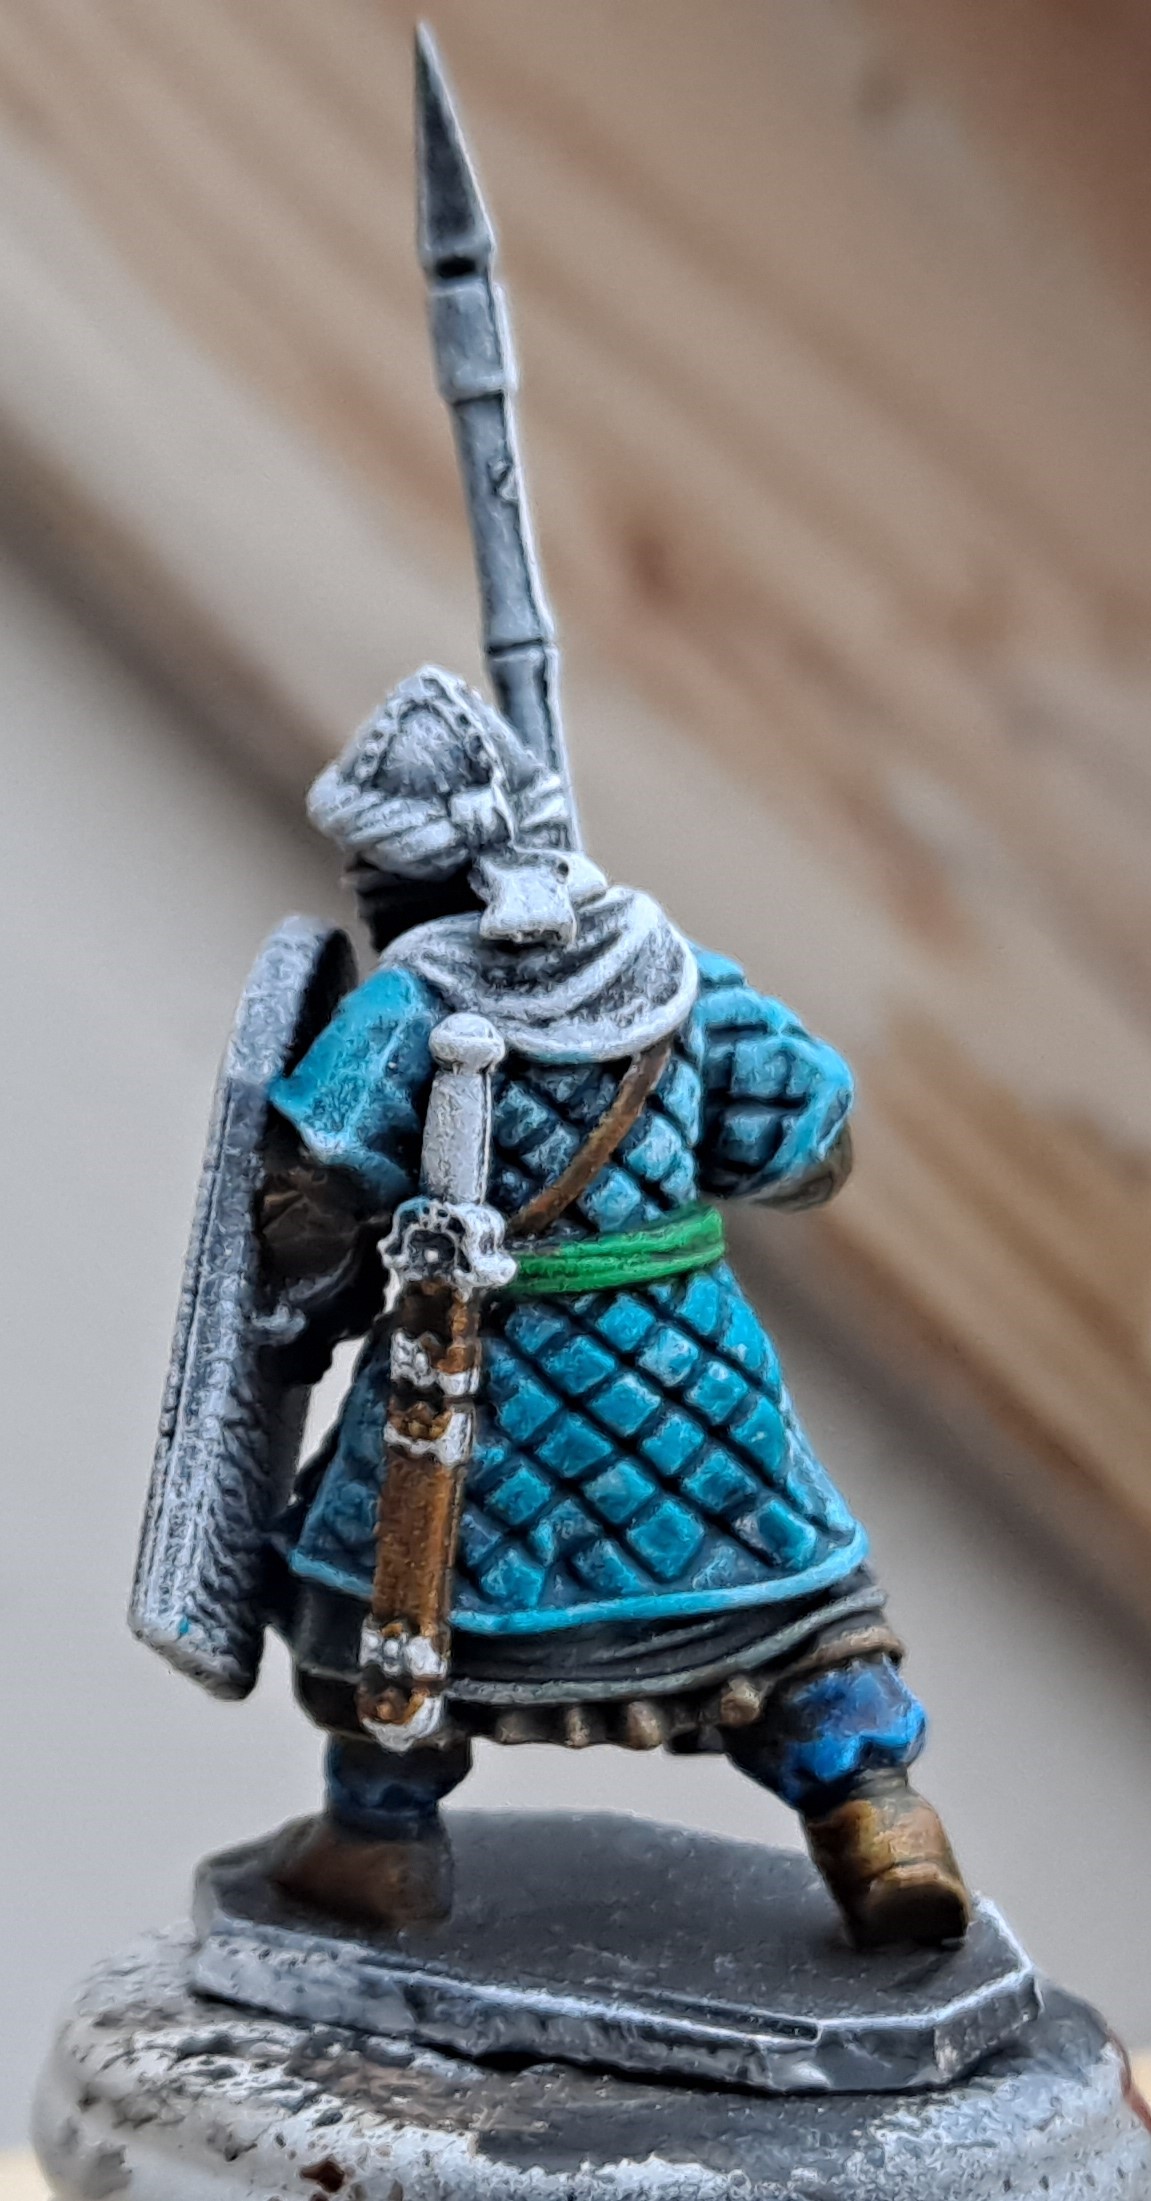
Finally the reverse of the current draft.

ADLG - Game Report 94

German-Tencteri (91) vs Patrician Roman (88)

This time a practice game for my Germans. I had made one small change to the orbat, and that was to detach the Allied unreliable commander in order to provide greater command flexibility.

Although the German’s lost the initiative the Roman’s decided to cede the option to attack in favour of the Germans. I committed the German cavalry immediately to prevent them immediately breaking through. I moved the remaining commands forward as quickly as I could. The Allies were on the right, moving forward as quickly as their medium legs would enable them.

Unfortunately for the Romans, the Saviour of the West was definitely off his game and unable to effectively command his troops. Meanwhile the German cavalry are fighting hard, while the infantry continues their advance.

The cavalry battle was slowly going the way of the German’s giving valuable time for the German warbands to close up to the legionaries. On the right the Allies are continuing to close the distance as rapidly as they can.

Contact all along the front line, with the German’s doing marginally better than the Romans. The German cavalry are continuing to impose their will on the Romans. On the right the Allies are now within striking distance of the left of the Roman line.

In the centre the warbands have broken through and in doing so destroyed one of the Roman generals, but the Roman reserve is ready to intervene. On the left the cavalry are still holding their own despite Roman reinforcements being thrown into the combat. On the right the Allies are now poised to take a Roman auxilia unit in the front and flank.

The Roman line of battle is now firmly been broken. While on their left flank the German Allies are now ready to roll up the line. On a quick count-up with the inclusion of the lost Roman General the battle was awarded to the Germans.

Outcome

A convincing win for the Germans.

Lessons Learnt

  • The choice of a detached Allied General seems to have been vindicated.
  • The army list seems to be reasonably well balanced now.
  • Paul’s decision to deploy an ambush on his left delayed the advance of the Allied corps by at least one turn.
  • ADLG - Game Report 93

    Taifa Kingdom (204) vs Catalan Company (262)

    Paul had redesigned his Catalan Company for a forthcoming competition and wanted a stiff competitive trial for it, but he chose me as his opponent! I decided to field a Taifa Kingdom army, which while not period correct should provide a challenging opponent for the Catalans.

    For this battle I decided to again deploy my lighter troops on the right flank, but this time the command had been reinforced by some heavy infantry. The cavalry was on the right with the main body of infantry in the centre.

    My plan, such as it was, was to break Paul’s centre with my medium knights. Leaving the infantry centre to follow up behind and mop up what remained. The Catalan light cavalry were withdrawn behind the centre group of Almogavars.

    I sent the light cavalry of to the flank when I saw the Catalan’s light cavalry’s intentions to cross the steep hill. Meanwhile my main line of knights is ready to engage. The right flank has good fire support available from bows and crossbows.

    On the right the bows and crossbows are causing attrition on the Almogavars moving down the coast. However, in the centre the knights have been severely bloodied by the Almogavars.

    The Taifa right flank is now engaged and the Javelinmen are holding their own. In the centre the two remaining knights have broken through and pursued, leaving them exposed to attack from the flanks. The infantry are much too far away too support them.

    The casualties are piling up. The Taifa right flank is continuing to defy expectations and is holding its own. The bowmen were particularly effective, and destroyed the unit against them. On the left the Catalan light cavalry have almost crossed the steep hills and are starting to deploy against the Taifa flank. In the centre the infantry are moving forward to engage the Almogavars.

    The right flank have defeated the enemy and are now pursuing the remaining light troops. On the left the one remaining Taifa light cavalry unit has been withdrawn as best as it could be, leaving a crossbowmen to await its fate. In the centre the farthest left heavy spearmen although assailed to the front by Almogavar and flank and rear by light troops soundly defeated the Almogavar. The cohesion points were very close, but the destruction of a Taifa light infantry unit threatening the flank of the Catalan knights tipped us over the edge to defeat.

    Outcome

    The narrowest win for the Catalans by one cohesion point from being a mutually assured destruction!

    Lessons Learnt

  • Close the distance and pin troops so that they cannot disengage.
  • Having a Plan B is essential when one’s main strike force is taken apart.
  • The line of heavy spearmen should have been in closer support to the knights.
  • ADLG - Game Report 92

    Andalusian Arabs(133) vs Feudal Spanish (190)

    Final game for the day, on another exceptionally convivially day’s gaming, was against Paul’s Feudal Spanish. He had decided to use some of his existing troops redeployed in this guise.

    A little more thought on how Paul would try and exploit the terrain is needed before making my plan. I should have appreciated that he would use his Almogavars to contest the village and hence given it a wide berth screened of by my heavy spearmen. Instead I tried to use my javelinmen for that purpose in order to try and go for an end run around the Spanish left flank with my cavalry.

    And once again I was far to aggressive with my light cavalry in the centre allowing them to be cut up from behind by Spanish lights. On the right I have made better progress, and would have made even more if I had placed my army commander on that flank.

    Once battle was joined the Spanish knights burst through my infantry line by overrunning the bows. On the left the Almogavars are working to turn my flank.

    The timely commitment of the Andalusian heavy cavalry in the centre has stalled he ability of the Spanish to break his knights into the depth of my position. On my left my Javelinmen have failed to evade far enough and are going to suffer the consequences! On the right the outflanking movement is causing some dispersion of the Spanish line.

    As predicted the Javelinmen on the left suffer the consequences of failing to evade far enough, and are destroyed. Meanwhile, the Spanish knights have broken through and about to join the party. However, on my right the attack against the hill has been more successful with the Andalusian right flank cavalry poised to roll up the Spanish flank – albeit that this was much too late to stave of the inevitable defeat.

    Outcome

    A win for the Feudal Spanish.

    Lessons Learnt

  • It is difficult to recover from a poor initial plan and deployment.
  • A poor decision to evade the javelinmen when they would have been better to sit there and try and hold their ground.
  • ADLG - Game Report 91

    Andalusian Arabs(133) vs Ostrogoths (95)

    Second game was against Mick’s Ostrogoths; this was at my suggestion because I thought they might be a good historical match-up for my Andalusians. That shows how much I know about this period of history – sorry Mick!

    The Ostrogoths deployed a strong ambush on their left, we were to discover much too late that Mick had mis-read the ambush rules and had placed too many troops in them, but we decided to soldier on regardless. The Andalusian’s deployed with the infantry in the centre with two cavalry groups on the wings. On the far right the Andalusian lights went out to play.

    Once the ambushes were blown it was then that we discovered Mick’s mistake. Not only had he deployed a few too many troops in the ambushes, but also regrettably he had deployed all his heavy infantry there which made them a prisoners in the terrain!

    The left wing of Andalusian cavalry made short work of the Ostrogoth horse, and in the centre the infantry held their own. The light troops contested the Ostrogoth lights in the brush, and largely ignored the Ostrogoth heavy infantry as they were moving so slowly in regrouping out of the wood.

    The Ostrogothic centre has been destroyed. Although the Ostrogothic bows are forming and the Andalusian right they will not be able to influence the battle before the Javelinmen seize the enemy camp!

    Outcome

    A win for the Andalusians.

    Lessons Learnt

  • Valuable lesson learnt by Mick on the type of troops best placed in ambush in difficult terrain.
  • Again the need to keep a reserve for the unexpected, if possible. Or as General Rupert Smith used to say “to reserve or not to reserve”.
  • ADLG - Game Report 90

    German-Tencteri (91) vs Romano-British (101)

    Time for another get together for the local ADLG community at Entoyment. I took along the Germans and also my Andalusian Arabs for the day’s gaming. First up it was another game against Harry and this time against his Romano-British, along with the Lady-in-the-Lake in the camp. As a side point Harry had only finished painting the army the previous day.

    It isn’t wise to repeat the same plan over and over again, irrespective of whether it is a different enemy. As one can see I have adopted a similar plan to that which I used when I fought Kevin’s Indians! Additionally, all the terrain was of my choosing.

    I was certainly overambitious on expecting my Allied command to hold off the great swathe of Arthurian warriors! Besides they forced through their command dice to move out of the wood to engage the Britons. In the centre I had a nice blocking force, while on the right I decided to withdraw the German cavalry into reserve, and allow the warband to hold the gap in the line between the gully and the wood.

    On the right the German cavalry have formed in the rear as a reserve. The Left and Centre are looking decidedly challenged.

    The Allied corps has crumbled. Hardly surprising when one considers the odds against them. Meanwhile another mixed bag in the centre, but on the right the odds are certainly looking far more favourable.

    The centre continues to hold and cause losses to the Britons allies. It is taking some time for the Britons to reorganise after their success against my Allied command.

    The centre command has caused significant damage to the Welsh allies, and on the right the reserves are having an impact on the British cavalry.

    Outcome

    Another very close game with Harry. It seems our battles always go down to the wire, with once again him coming out on top!

    Lessons Learnt

  • A poor deployment, contributed to the German Allies being destroyed with little to gain.
  • The Allies attached commander makes them far too inflexible.
  • ADLG - Game Report 89

    German-Tencteri (91) vs Classical Indians (79)

    For the next trial against Kevin’s Vedic Indians, the orbat was changed, along with newly painted reinforcements of the correct base sizes for their troop type, to:

  • Right Flank, the brilliant CinC’s command of 5 heavy swordsmen (of which 4 were elite), 2 light infantry bow, 4 medium cavalry (of which 3 are elite) and 2 light cavalry with javelins.
  • Centre, an attached ordinary general with 5 heavy swordsmen and 2 light infantry javelins.
  • Left Flank, an unreliable allied attached general (in ambush) with 6 medium swordsmen and 2 light infantry javelins.
  • The ambush was sprung immediately by the proximity if the Indian light infantry, with no need to roll for hesitancy! However, even in woods the speed of movement was significantly constrained by poor command dice. I decided to hold my main line back while the allies drew in the enemy forces – or at least was the intention.

    Once again on the left the German light infantry have not fared well. We, have however, forced the commitment of one elephant to the Indian right flank. I have committed the German cavalry to engage their Indian peers on the right.

    On the right a mixed result for the German cavalry, having lost some units it has penetrated the line and capable of coming around on the flank of the chariots. In the centre we are awaiting contact, but on the left the Allied warband has encircled an elephant and is about to destroy it.

    Although the right flank has taken some losses from the heavy chariots in contact it is fighting hard. The centre is more successful against the elephants. Whilst the allies have destroyed the elephant and are regrouping to pursue to the enemy camp.

    On the right the battle against the Indian heavy chariots has been hard fought, and the German cavalry after penetrating has now reformed and is charging back into the fight. In the centre another elephant has met its maker and another will shortly do so. The Allies are fighting hard to advance on the enemy camp.

    Outcome

    A victory for the Germans.

    Lessons Learnt

  • The army is much better balanced.
  • Although the jury is still out on how to command and deploy the Allies.
  • ADLG - Game Report 88

    German-Tencteri (91) vs Patrician Roman (88)

    I decided that it was high time I spread my wings and enter a non-UK ADLG event, and decided I would get permission from the travel authorities to visit the US for a week at Historicon in Lancaster PA. With that in mind I needed an Army that would physically travel well, and I decided that the German Tencteri tribe would be the perfect choice. Now, the next step would be to trial a number of orbats.

    As a starting point I thought it best to revisit the same troops as their previous battle against Paul’s Patrician Romans. Although there look as if there are a lot of medium troops, it is misleading as they were in fact costed as heavy infantry. With the actual heavy infantry bases being the elite bases. With that minor clarification we went over to the attack!

    The German Cavalry has managed to start to work the flank, while the bulk of the troops advance. On my left my light infantry javelins are struggling against the Roman elite light infantry in the wood.

    As predicted the javelins more than struggled they were defeated! On the right the Cavalry are having more success.

    The left wing has committed two warbands to defend the flank, while their peers close in on the Roman line. The Roman Cavalry has been soundly defeated and the remaining units have been outflanked. Although the German Light cavalry are not doing well in protecting the right flank.

    The Light Cavalry on my right have been defeated which is limiting the opportunity for the remaining German cavalry to penetrate deeper into the Roman left flank. Of even greater concern is the unwillingness of a lone Roman Cavalry unit to die despite being assailed on all flanks. The German left flank is not looking very comfortable either with the heavy infantry failing to defeat some light infantry in the marsh.

    Once the Roman line engages the warbands it is effectively game over as warband after warband is rapidly overrun. However, the Roman Cavalry unit that was surrounded finally died.

    Outcome

    A significant defeat for the Germans.

    Lessons Learnt

  • The simple expedient, based on the Roman example, of employing attached commanders, or unreliable commanders might provide more points for more troops.
  • The current orbat lacks medium troops that could be much more effective in broken terrain.
  • There is no merit in impetuous troops in holding them back for too long; they need the opportunity to secure the benefit of the furious charge.
  • ADLG - Game Report 138

    Seleucid(42) vs Aramean(74) I had time for one quick game, and I now hat Tony is a quick player! So onto battle with a relatively historica...