Bolt Action - Game Report 11

Operation Slice June 1944

Introduction

On to the second Axis vs Allies Tournament game. A chance for 9 Platoon 1st Battalion Duke of Glendon's Light Infantry (1 DOG) to redeem itself following its first battle - I hoped. The scenario for this game was Scenario 12 Sectors.

Situation

The battle to extend the Normandy beachhead is continuing. 1 DOG with support has been committed to exploit a gap that has opened in the German lines. Time available to exploit this appears to be short as a German counter attack is highly likely to seal of this gap. 

Enemy Forces

The Germans were identified as a platoon of Panzer Grenadiers supported by Mortars and Nebelwerfers with a self propelled artillery gun in support. 

Friendly Forces

9 Platoon was again supported by a Churchill, a Bren Carrier and a half track. The FOO promised us a preparatory bombardment and he did not disappoint. Both he and the Sniper were deployed well forward to support the operation.

Mission

9 Platoon is to seize and hold the village of St Honore.

Battle Report

I deployed 9 Platoon well forward in the north west quadrant, waiting for the preparatory bombardment against the Germans in the south east map quadrant. The Divisional gunners did not disappoint, and their fire was very effective in disrupting the German response. The initial task was to remove the German fire support. This, the Churchill and the mortar section were quite successful at. The FOO also managed to target the Nebelwerfer successfully.

The plan was to use the mobility of the Halftrack, carrying No 3 Section, and the Bren Carrier to secure the south west quadrant by attacking down my right. On my left I planned to advance No 1 Section and No 2 Section with fire and manoeuvre moving east and then south to secure the south east quadrant. While this was happening the Churchill would maintain a central position to provide fire support to the right flank, and left flank as required.

1 Section secured its objective, and the Bren Carrier was able to exploit forward to bring fire onto the depth of the German position. On the left the other two sections manoeuvred forward under fire, supported by accurate sniper fire. A number of German units were destroyed.

Outcome

A major British victory. Unfortunately the battle photographer failed to keep up with the battle, and there were only these two photos taken of the action.


Bolt Action - Game Report 10

Operation Hen House September 1944

Introduction

The final game of the Allies vs Axis Tournament was against Jason's Finns. The scenario for this one was Bolt Action Scenario 6 Demolition. As always it rather challenges one's imagination to think of how the Brits fought the Finns in WW2; but I am always up for a challenge. Just as this game was!

Situation

The German and Finnish attack into Northern Russia, Operation Arctic Fox, is making progress and is now threatening Murmansk. In a show of allied solidarity Stalin has invited the British Army to support the defence of the area. A reinforced Brigade Group has been sent north with an Arctic Convoy in response. The Brigade Mission is to safeguard the northern port in order to relieve pressure on the Soviet Forces garrisoning Murmansk.

On the 30th Aug a Finnish breakthrough led to the commitment of the Brigade Group, less a Brigade reserve from 1 DOG, to be deployed forward on a counter penetration mission. 1 DOG has been spread widely to guard and protect vital installations in the area.

En Forces

A forward detachment from the 6th (Finn) Division has broken past the forward British forces and is now advancing on Murmansk. It is made up of Infantry with armour and artillery support.

Friendly Forces

9Pl had recently consolidated its veteran infantry into numbers 1 and 2 section. 3 Section were reinforcements from the battalion left out of battle troops. The CO had provided a sniper team, Mortar section and Bren carrier from Bn Support Company, and one of our FOOs. Division had allocated us a Churchill tank and an M5 Half Track.

Mission

9 Pl is to secure the electrical power distribution systems for the port area, and to destroy the supply dump being used by the enemy's forward detachment.

Battle Report

1 Section secured and Pl HQ secured the objective rapidly. We were supported well by the Churchill and on our left flank the Bren Carrier. The FOO and our sniper were in good over watch positions. 2 and 3 Sections were deployed to try and take an end run at the enemy's supply dump.

The initial enemy attack was down my right flank and from my front, but the firepower from the Churchill's MGs on the right and the Bren Carrier on the left was essential in suppressing the enemy.

The sniper and mortar were also able to suppress the enemy artillery piece that they had in support.

Half way through the action the Bren Carrier was destroyed.

2 and 3 Sections were unable to make forward motion because of the threat from the Finnish Armour. Before they could launch their own attack, they were needed to counter-attack the enemy who were advancing from half-left. They advanced rapidly in spite of the threat of the enemy tank to their left.

In the end 1 Section and Pl HQ were confronted by two threats to the power house. The enemy showed great courage in closing the distance through the effective fire we were able to bring down on them. Despite this fire they managed to detonate a satchel charge that destroyed the power sub station. 

Outcome

A win for the Finns, but I managed to minimise the impact through securing additional mission objectives.

A very hard fought battle. In this scenario, as Jason demonstrated, there is a need to be aggressive in order to move forward and destroy the objective the enemy is protecting. You have to be prepared to accept casualties in doing so, as both Kevin and I discovered when we played the scenario.


Bolt Action - Game Report 9

Operation Striking Cobra - June 1944

Introduction

Well Michael did it again. He arranged an excellent days competition at Entoyment. This time we would be playing as two teams Allies vs Axis; 1000 points per army. I of course enrolled 9Pl 1 DOG into the allied force. 

However, for me the day did not get of to a stellar start. I arrived nice early, only to realise I had forgotten to pack my vehicles; a game without my Churchill MkVII oh calamity indeed. I had to hot foot all the way back home, and managed to turn up 15mins after H hr.

The first scenario was a new one devised by Michael.

Situation

The 7th Armd Division have been forced to retire from Villers Bocage. Corps HQ were deeply concerned about the danger of the Germans following up and exploiting their success. Bde HQ were given the mission of setting up a hasty defence to delay and if possible stop any German advance. 

CO 1 DOG has been ordered to hold the village of St Pere SW of Villers Bocage until ordered to retire. The situation remains fluid, and there is uncertainty about the degree of flank protection for this position. he has ordered 9Pl forward as an advance guard to hold the village while the rest of the battalion deploys.

Enemy Forces 

Signals Intelligence were tracking a German Panzer Grenadier force in the local area. Indications are that the commander of this force is Ober Leutnant Parry. This force is supported by tanks and recon vehicles.

Friendly Forces

9Pl had recently consolidated its veteran infantry into numbers 1 and 2 section. 3 Section were reinforcements from the battalion left out of battle troops. The CO had provided a sniper team, Mortar section and Bren carrier from Bn Support Company, and one of our FOOs. Division had allocated us a Churchill tank and an M5 Half Track.

Mission

9Pl is to secure and hold the village of St Pere.

Battle Report

The initial deployment started well. 3 Section in the half track deployed forward and occupied the large building. This would allow then to provide fire support to 1 and 2 section to the left and right respectively. 

Our artillery wasn't very effective, and did not cause any delay to the German advance. The Germans occupying the other building in the village were rapidly suppressed. On the left, on the other side of the river, my sniper team managed to provide some delay and disrupt the enemy advance. However, he was forced to withdraw rapidly when the enemy out flanked us on our left.

The German tank was a very unwelcome distraction. There was a fire fight with our Churchill, with the Churchill scoring a glancing hit. However, the enemy tank recovered quickly and its shooting was perfect as destroyed the Churchill and the M5 half track as it was moving to support the sniper team. 

The Panzer then attempted to overrun 1 Section. They stood there ground and allowed it to accelerate through them. I tried to launch an assault against the tank but was forced to take cover instead. 

On my right flank 2 Section advanced into the woods, from which the Mortar Section were firing. They advanced into the face of a German grenadier section armed with assault weapons and 2 Section perished to a man.

Outcome

A win for the Germans who secured 4 of the 6 objectives to my 2. 

However, the scenario was great fun and a must to be added to the Bolt Action mix.


Wars of the Roses - Game Report 1

Wars of the Roses - with flat figures

Introduction

My friend Dave decided to invest, and I do mean invest, in buying up a number of 18mm armies of plexiglass flat figures from Wofun. When you buy the set they come with a set of rules. Dave now has a number of periods which he can use, and best of all for him there is no painting involved. These may not be everyone's cup of tea, but they are relatively inexpensive and actually very presentable.

I have now played a couple of games via Zoom with Dave using the wars of the Roses figures and the house rules with some minor modifications that Dave has brought to the rules. I thought that it would be instructive to share the battle report that Dave prepared after the battle. 

A big thank you to Dave for allowing me to share his report! Comments in italics are my own observations!

Terrain

The table was 5’wide x4’ deep, this gave 6 sectors

The random terrain selected was:

I selected quite a small area of woodland and keep the terrain towards the edges of the battlefield except the Medium gentle hill, which was placed towards the centre of the table.  The wood was placed on my table edge, the boggy ground on the table end half way up the table. Colin had the option of moving 1 piece of terrain within its sector and chose to move the woods to the centre of the table!  Even now I’m not sure he knows why? (Dave, I have to confess I am having a bit of a blind spot to terrain selection and options at the moment, just see my recent ADLG game at the London Grand Tournament!)

Armies

Deployment

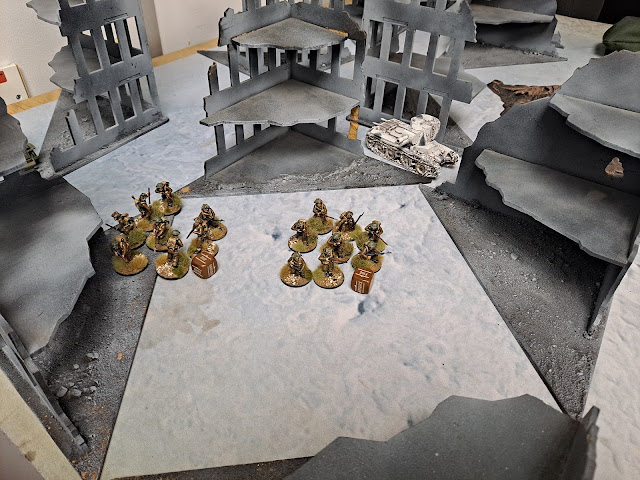
The Yorkist Army Deployed, Stanley’s vanguard took the centre ground, Montague deployed on the right and Scrope on the left. 

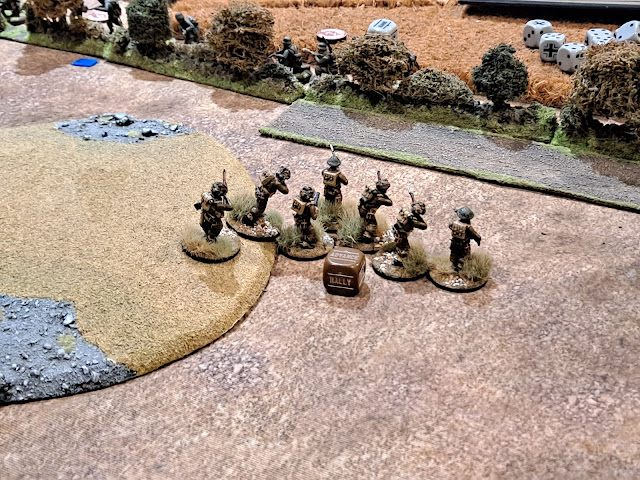
The picture of the Lancastrian forces is too indistinct, they must have deployed in the morning mist!

The Opening Moves

The Lancastrians advanced their right with a view to overwhelming the enemy left before their centre and right could intervene. Skirmishers were sent forwards into the woods.   Montague advanced his right toward the area between the wood and boggy ground; this broke up his battle line and the ground seems to prove difficult at times as several units fell into disorder during the advance. 

The Yorkist archers and handgunners were sent forward towards to the woods where they were quickly engaged in a skirmish with the Lancastrians.  

As the centre and right of the Somerset’s force closed on the Yorkist line there was the usual exchange of bow fire in which the Lancastrian bowmen gradually gained the upper hand.

In the centre the skirmishing archers were chased off by the javelin men; Stanley ordered forward his Men at Arms into the woods to attack them, but they refused to move; he repeated the order and still they refused, so eventually bow fire was opened on them and the javelin men withdrew behind Roos.    The leftmost body of Yorkist archers, having fired off a few shots at Roos’ advancing line, to little effect, were now withdrawn behind the line and sent to counter the crossbowmen which had outflanked the Yorkist line.

Battle Joined

Somerset’s men at arms came forward against the left of Scrope’s line which, weakened by bow fire, were forced back and became disordered as they tried to recoil into the archers behind them.  Charged again, the bowmen broke, leaving the men at arms to face those of Somerset. 

In the Centre of the line Roos’ bowmen opened a heavy fire on the Yorkist units to their front. This induced Stanley to launch an attack with this billmen, which was repulsed (draw, both sides backed off).  Stanley brought his remaining troops across, together with some of Montague’s that had become separated from their own wing; this had now advanced beyond the woods and was out of sight.  Here Montague’s men came within range of Percy’s line which opened fire on them.  Montague halted and returned the fire.

On the other flank things were starting to look difficult for Scrope; many of his units had suffered from the continued bow fire and his left was under pressure and could soon crumble.  To his right Stanley had made no headway and the centre of the Lancastrian line under Roos looked in good shape.  Scrope had his bowmen release their final arrows and then led forward his strongest unit of Billmen against the left of Somerset’s division.  This attack smashed into Somerset’s line which recoiled and then broke.  

The bowmen to their right, fighting behind their men at arms, panicked and turned on their heels.  Somerset, close by, attempted to stem the rout, but to no avail.  Some reports say he fled with them, others that he was knocked over and stunned in the confusion, and was then carried from the field by his retainers.  Whatever the truth, the effect was the same; the whole of Somerset’s command, Leaderless and perhaps fearing they would be cut off, turned and fled. 

Although Roos and Percy were still in good shape, the Lancastrians decided to quit the field in good order. 

Losses

Outcome

This was an extremely enjoyable game, with lots of issues on both sides.  

I think it will spark one rules change: troops recoiling and whose route is blocked only by skirmishers that are not engaged in hand to hand combat will just push the skirmish unit(s) back rather than suffering disorder. Other troops will continue to prevent recoil /withdrawal and cause disorder.

This battle had similarities of my last game, where the enemy had difficulty in getting their right flank engaged in the battle.  On that occasion I was fortunate in being able to capitalise on this and defeat their left; on this occasion the spirited charge by Scrope, perhaps an act of desperation, turned the tables. (Hardly desperation, rather a calculated risk, even though I dare say so myself! One has to come up lucky on the dice at some time, why not then)  The history books are full of such examples. 


ADLG - Game Report 28

Early Achaemenid Persians(64) vs Athenian Greeks (60)

At the LGT I purchased a very nice wargaming mat; actually it was 4 by 6 so there was enough for me to have a mat and one for Adam. Therefore, when Dave proposed another Zoom game it was an excellent opportunity to 'blood' the mat.

We decided on a classical Athenians vs Persians battle, with him taking the Greeks and me with the Persians.

For terrain Dave chose the coastline (need to get one as the river doesn't quite make the grade). He had nice secure flanks. For my part I deployed my Infantry heavy Corps on the right and centre, leaving my cavalry on the left looking for an opening. I was attacking.

I decided that I need to get my shots in with my bows from my infantry and cavalry as soon as I could. 

In the first round of shooting I had clearly failed to issue any archers with any arrows, with negligible impact on the Greeks! Dave has deployed his hoplites in two ranks, this would turn out to be a fortuitous decision.

After evading from the hoplite advance, this time the Persian cavalry have forsaken their bows and accepted the combat when challenged by the hoplites moved into contact. On the right one of my Sparaba has managed to destroy a hoplite unit in contact where as my Immortals are not faring well, losing one and two of the others suffering damage.

In the centre the Persian cavalry have done well against the hoplites, being elite and armoured helped as did some better than average combat dice.

On the left there is some ineffective sparring going on between the light troops in the rough ground. While my cavalry are feeling out engaging the Thracian and Peltast flank guard.

Elements of the second line of hoplites are now in contact and the Persian infantry are a little worse for wear. However in the centre the elite Persian guard cavalry are braking through, and preparing to roll up the Greek line.

The Thracian flank guard is outperforming itself despite being outflanked, and attacked in the rear. In the rough ground the Persian light troops are losing ground against the Greek light cavalry.

Outcome

At that point Dave conceded as he could see the way the battle was going. We both felt that the infantry battle came out as we would have expected, albeit with slightly more hoplite losses than we would have expected. 

However, the Persian cavalry did rather better than we thought they should have done by receiving a charge. The hoplites do not have their +1 benefit from spears against cavalry when they charge, despite this being an appropriate tactic for the period. Something for the greater gods of the rules to consider. In this case the fact that the Persian Cavalry were elite and armoured also had some impact on the outcome. 

Lessons Learnt

  • There is certainly a benefit in keeping troops in the second line as an immediate reserve.
  • I guess at some point even bow armed troops, such as the Persian Cavalry, have to risk it and come into contact to try to win the battle.
  • I think I will dispense with the Levy and go for a fortified camp in the future.

Bolt Action - Game Report 8

Operation Hatton – August 1944

Introduction

Prior to the forthcoming Bolt Action tournament, Kevin Parry invited me over to his war room to practise with our BA forces. I decided to deploy a similar, but not identical, force to the one I would use in the tournament.

Situation

The Battalion Commander laid out the situation for me. Divisional intelligence had identified a German forward headquarters which needed to be destroyed. This headquarters was controlling all the forces east of the river Orne. Its destruction would hamper the Germans to respond to forthcoming operations to secure Caen.

Enemy Forces

As far as we could determine from aerial reconnaissance German forces were likely to be light. However, we detected what looked like a newly painted Panzer IV or Tiger tank in the vicinity.

Friendly Forces

The CO provided OC 9Pl with additional support for this operation. He secured from the Divisional engineer regiment a Wasp flamethrower and a M5 halftrack. he also contributed from battalion resources a 6lb anti-tank gun and a mortar team.

Mission

9 Pl 1 DOG is to destroy the enemy headquarters at grid NC675184

Combat Report

The FOO and the Mortar Fire Controller deployed early into the westerly of the two buildings on the High Street. This gave them ample visibility both northeast and southeast. I deployed with one and two sections on the south side of the main road. I gave the mortar section orders to set up to the rear of the westerly building. The Wasp was to deploy with them until we found a suitable target for it. On my left out of view I deployed the anti-tank gun with its Bren gun carrier to secure my vital ground.

The Germans counterattacked quickly. They were determined to stop my men reaching their objective. They committed at least two sections their tank and their recce vehicle to counteract my advance. For my part I managed to pin down his section that was advancing on my left to my own vital ground.

Number 1 section were in serious trouble. The tank was inflicting heavy casualties with its machine guns, and an enemy pioneer section equipped with flamethrowers was closing on its position. Number 2 section who was supposed to advance on the right were pinned down by German spandaus and failed to advance.

Sgt Browne VC (awarded posthumously for this action) Decided to seize the initiative. He ordered his Wasp forward to outflank the Panzer IV. On his first attempt to fire the flame failed to ignite. He then came under heavy machine fire from a German halftrack and mortar fire. While they were fixing the problems with the igniter circuit the Panzer 4 turret swung round to try to engage them. The shot missed but caused the carrier’s engine to stall. Fortunately, the remedy worked and the flame ignited enveloping the tank. The tank wasn't destroyed but it was now immobile. Before Sgt Browne managed to restart the carrier, it came under heavy mortar fire again. This time igniting the fuel tank and destroying it. For his commendable personal bravery and valour, he was awarded the Victoria Cross posthumously.

On my left flank Number 3 section, supported by the half track and Bren carrier, were able to advance and close with the enemy defending the hedgerow. However, the damage inflicted to numbers 1 section and 2 section prevented me advancing and securing my objective. Equally the Germans were unable to secure their own.

Outcome

An honourable draw. But an exceedingly exciting game!


ADLG - Game Report 27

New Kingdom Egyptians (14) vs Assyrians (7)

London Grand Tournament Game 5

My final game of the tournament was against Dave from Team Taifa

I was defending in this game and I had a secure right flank courtesy of the coastline Dave deployed. I was trying to use the impetuous Sherden warriors as shock troops on the right.

However, once the deployment was complete, I felt I had to move the centre to the right. To do so I committed the Sherden to attack in order to cause disruption and attrition, while I reorientated the main line of battle. 

Unfortunately, the gods of Egypt we're not in favour of the impetuous troops and they didn't do well on the combat. However, I have managed to re orientate the line.

On the left my Chariots at last have some open ground in which to manoeuvre. If they had had a commander who was capable of using them to their best effect! In the end they moved to bow range and tried to engage the enemy Chariots which unfortunately were armoured. Once the right came into contact with Dave’s left they did not stand as long as I hoped they would.

Outcome

A win for the Assyrians 8 cohesion points to my 29 points lost

Our Team perspective we cam 10th out of 12: Darrel and I were rescued by Harrison. 

Lessons learnt

  • This was the one game where I really learnt from Dave the advantages of armouring my Chariots.
  • I think I need a radical rethink of the army I used.
  • Understand your own troops. On returning home and checking my army list, I discovered I have paid for a fortified camp. If only I knew that during the games I might not have tried to keep protecting my camp!


ADLG - Game Report 26

New Kingdom Egyptians (14) vs Neo Babylonians (8)

London Grand Tournament Game 4

My first opponent on the Sunday was Graham from Team Keith Martin Smith.

This is a game I would like to draw a veil over. I think my brain was in meltdown first thing on Sunday morning. That can be the only thing they explain such a cockeyed deployment. 

The piece of terrain with the dice on is impassable ground, which I chose and placed that way around. Graham chose the desert in front of my heavy troops and that's where I decided to field the troops who had most difficulty in moving through it.

.This was not going to end well.

My only hope was that my force on my left flank might succeed in small measure before my other troops managed to pass through the difficult ground

What little hope I had, vanished as my troops were taken apart by Graham.

Outcome

A crushing defeat for the Egyptians losing 28 cohesion points to a miserly 2 on Graham

Lessons learnt

  • The benefits of a secure flank to protect one’s camp, does not outweigh the need for open ground to enable your heavy troops to deploy and fight.
  • Not my greatest hour!


ADLG - Game Report 25

New Kingdom Egyptians (14) vs Vedic Indian (35)

London Grand Tournament Game 3

My third opponent on the Saturday, was Steve from Team Warlords. 

My plan, was to attack either side of the marsh, and try and secure local superiority and destroy each flank piecemeal. A grand plan when you write it down, but the execution was appallingly bad.

As I was attacking I managed to close the distance very rapidly with some good command dice rolls. It also helped that my medium troops were on the left flank for negotiating the fields.

On the right his Chariots were in the plantation, and we ended up having a lengthy duel of bows.

I managed to breakthrough to the left of the marsh. This would have been quite beneficial, and I might have won, if only my impetuous Sherden warriors were able to have some success.

On the right, I managed to introduce a bowman unit to help engage his Chariots, with some success. In the centre I rather coyly failed to attack uphill against his elephants. I think I was concerned about the benefits he would have uphill. In the end I rashly charged my Chariots into the plantation to engage his Chariots: it did not end well.

Outcome

A win to the Vedic Indians 17 to 26 in a very good natured and friendly game.

Lessons learnt

  • The armoured light Chariots, and army composition, lesson has been learnt again.
  • I was a little coy in attacking the troops on the hill.

ADLG - Game Report 24

New Kingdom Egyptians (14) vs Oman and Gulf States (19)

London Grand Tournament Game 2

My second opponent of the day was Julian from Team Le seul moyen est l'Essex. His army had 31 units compared to my 26. if I was to have any luck in reaching 31 cohesion points I need you to get in fast and kill lots of units: that really dictated my plan. My intelligence reports indicated that Julian liked to try and get round peoples flanks as quickly as possible. Given the size of his force I was not surprised that this would be his tactic.

Here come the enemy answer my left flank. Julian’s clear intention was to sweep round and roll up my left flank. 

On the right, I tried to get my Chariots into contact and if possible overrun his camp.

My Chariots failed to breakthrough, but my left held its own sufficiently to allow the centre to cause as many casualties as possible. 

Outcome

A loss to the Egyptians 26 cohesion points to 20. After this battle everyone was impressed that I managed to get 20 cohesion points on Julian.

Lessons learnt

  • The mistake of not armouring the Chariots is starting to come home.
  • As is the composition of my three corps.


ADLG - Game Report 23

New Kingdom Egyptians (14) vs Assyrian Empire and Sargonid (9)

London Grand Tournament Game 1

I was fortunate to be invited to be part of a three-man team at the London Grand Tournament by Darrell and Harrison Pearce. They kindly allowed me to field my New Kingdom Egyptians ask the biblical component of our team. Our team was named “Without a clue”, I was not sure how apt that name would be until the end of the competition. More of that later.

My army composition is as below. As you can see, I've groups all the Chariots together in one command. My aim was to use this as a force to try and breakthrough with or to work around my opponent’s flanks: of course terrain permitting. Also, my impetuous Sherden warriors were all together in another command.


My first opponent of the day was Max from Team SELWG Champs and Chumps, and his fine force of Assyrians.

My plan, such as it was, was to try and get my centre with all the two handed cutting weapons into contact as soon as possible. On the flanks I would try and delay and cause as much problems for him to prevent him coming round on my flanks. The one question Max, and other opponents, asked me was whether my Light Chariots were armoured? well they weren't, but perhaps it would have been better if they had been.

On the left I have mixed fortunes with the Sherden warriors, losing two combats of winning one.

 On the right despite losing some Chariots I have done quite well.

 In the centre I've had a number of victories against the Assyrians.

 Outcome

A win for the Egyptians 17 to 22.

Lessons learnt

  • Getting in quick with my centre certainly helped
  • I might have been better advised to make the commands more similar: this lesson will be reinforced in subsequent battles.


ADLG - Game Report 138

Seleucid(42) vs Aramean(74) I had time for one quick game, and I now hat Tony is a quick player! So onto battle with a relatively historica...