Bolt Action - Scenario 1

Hasty Attack

Divisional HQ has brought forward the time of the attack forward by 24hrs. The troops earmarked for the attack are currently still in their assembly areas some way from the forming up point.

Set Up

Both players roll the dice the higher score decides whether to attack or defend, the lower dice chooses his table edge.

Attacker rolls for each unit in his force, on a die roll of 1-3 they arrive on GT 1, on a die roll of 4-6 they arrive as reserves from GT2. GT 1 attacking troops do not need an order check, all units from GT 2 onwards do need to take an order check as per the rules. If a unit capable of being deployed forward arrives on GT 1 it can be pre-deployed up to 18 inches in from the attacker’s table edge. Troops that can be forward deployed that are scheduled for arrival from GT 2 can be deployed forward and exchanged for a GT 1 arrival unit on a further successful die roll of 2-6.

Defender is allowed 50% of his force deployed forward on-board. The 50% includes any troops that can be pre-deployed forward. Troops deployed (less pre-deployed forward units) set up within 18” of the player’s table edge. Remaining troops arrive from GT 1 with an order check as defined in the rules.

The attacker places an objective within 18 inches of the defender’s table edge.

The defender places an objective within 18 inches of the attacker’s table edge.

A third objective is placed on a terrain feature within 12 inches of the tables centre line. On a die roll of 1-2, it is in the left third of the table, 3-4 in the centre third, and 5-6 on the right third.

Mission Objectives

The objective is to secure as many objectives as possible while destroying more of the enemy than you suffer.

First Turn

Prior to the arrival of the first troops the attacker rolls to determine if he has a preliminary bombardment. This arrives on a die roll of 4-6. An attacker’s special bombardment rule does not apply.

Units arriving on GT 1 or later must arrive on their own table edge. The defender’s forces that arrive on GT 1 or later do so with an order check. The attacker’s forces on GT 1 do not need an order check, but they do need an order check from GT 2 onwards.

Game Duration

A standard 6 turn game, with a possible 7th turn on a dice roll of 4-6.

Victory

Victory is measured by which side scores the most points:

  • 1 pt per enemy unit destroyed
  • 1 pt for holding the objective in the attacker’s half of the table
  • 2 pt for holding the objective astride the table centre line
  • 3 pt for holding the objective in the enemy’s half of the table. 


Bolt Action - Game Report 12

Operation Racer September 1943

Introduction

I was inspired by Mike's scenario for the last Bolt Action Tournament that I decided to have a go and write my own. 

I was equally inspired by reading about an action by the Canadians at Le Mesnil-Patry in Normandy. In this action the time of a planned attack was brought forward by 24hrs and therefore troops were not in the correct place and there was a great deal of confusion and improvisation. 

Hence the scenario "Hasty Attack".

Kevin agreed to give the scenario a try and this allowed me to bring 9 Platoon 1st Battalion Duke of Glendon's Light Infantry (1 DOG) into battle again. Kevin laid out some very impressive Italian terrain which proved to be very good for the battle.

When we rolled for sides, I became the attacker and Kevin the defender.

Situation

The allies have consolidated the Salerno beachhead and have successful beaten back the German counter-attacks. The allies are now preparing for the breakout and to advance North. In preparation for the breakout the Divisional Commander wants to seize some key ground. The attack was planned for 24hrs, but the pace of overall operations means that this attack has been brought forward to today. C Coy 1 DOG has been given this task, and 9 Platoon will be their point platoon.

Friendly Forces

9 Platoon suffered losses in the landings, but has since been reinforced. It now has 2 inexperienced rifle sections and a veteran infantry section. The platoon has been reinforced from Division with a FOO, an M3 half-track and a Churchill and from the Battalion a mortar section with MFC, a Bren gun carrier, and a sniper team. 

Enemy Forces

A mixed German Infantry Platoon with armour support were known to be in the immediate area of the objective. 

Mission

9 Platoon is to secure the Villa D'Pagini

Battle Report

Regrettably the combat cameraman was not available for much of the battle.

The battlefield. The German vehicles are two of the objectives, the third is behind the Villa. The MFC was successfully deployed forward. The bulk of the German forces are on their side of the river, but they do have a section deployed close to the Villa.

OC 9 Platoon has led forward one of the inexperienced rifle sections, while he has sent the other forward in the half track to secure the objective (the Bren carrier) by coup de main. The Churchill can be seen engaging a Pz IV advancing behind the bridge. The firefight between the two AFVs was indecisive with no hits recorded. While the Bren Carrier is there to provide fire support for the infantry section trying to assault the Villa. 

The Churchill has been forced back by the PzIV which is now advancing over the bridge.

Meanwhile the half track has itself been forced back and the section it was carrying is suffering losses from the Germans that are now counter-attacking in force. The second wave is trying to make progress and provide fire support. 

OC 9 Platoon is making a desperate attempt to move his platoon forward and to occupy the Villa and from that seize the objective in the defender's zone..

Outcome

A major victory for the Germans in that they retained their objective and seized the other two. The coup de main attempt by the half track was a dismal failure. Moreover, British fire support was less than its usual high degree of effectiveness!

The scenario  played reasonably well, but we both think it might need a little tinkering with. The balance of forces at the beginning might need to be improved, and it warrants more play testing. However, it hasn't put me of thinking of more scenarios.


ADLG - Game Report 30

Feudal French (182) vs Later Crusaders(190) with Mongol Allies (270)

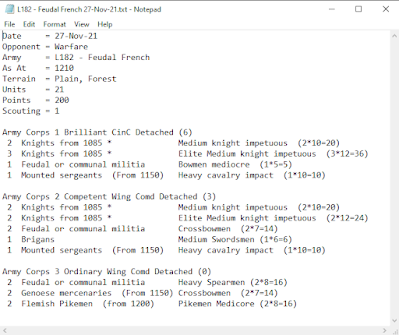
Kevin kindly decided to field an army to fight my Feudal French for the second iteration of my army in preparation for Warfare.

In this iteration I decided to give the mediocre infantry one more outing, but regrouped the cavalry commands. Another change was to improve the command ability by taking a brilliant CinC.

I have to say that a wall of heavy knights is imposing, I wish it had that effect on the enemy! As you can see there are clearly some of the enemy of on a flank march or something equally cunning.

As I moved in closer I decided to take the gamble and move my left wing to the right flank as the enemy started to slip further to their left.

The devilish Mongols came on as I suspected on my right behind my infantry. Fortunately my left flank knights were closing in fast to repair the situation. In the centre I was making good progress and my knights were starting to achieve some dominance. However, the losses inflicted against my infantry line were again sufficient to tip the balance in the enemies favour.

Outcome

This was a much closer outcome. If I had gambled earlier it might have been a very different story. 

Lessons Learnt

  • Once again I had too many poor quality troops. back to the drawing board for army design.
  • The Brilliant CinC proved invaluable in repositioning the left wing. 
  • If you suspect a flank march is about to arrive then make sure that your troops are not within charge reach of the edge or else they will get flattened!
  • Remember that furious charge does not apply with cavalry against cavalry - sorry Kevin, a hangover from the previous test game when Pete and I forgot to apply it against his infantry!


ADLG - Game Report 31

Feudal French (182) vs Sicilian Normans (188)

For my final pre-Warfare test game, Paul kindly offered me battle with his Sicilians.

By the time of our battle my list had been submitted for the competition. This was the final iteration, where I decided to choose a Northern French army which allowed me to have some Flemish Pikes. I thought that the benefits of pikes would overcome the fact that they were mediocre pikes! 

In this game I deployed the infantry on the left with cavalry in the centre. On the right I deployed some crossbows and medium swordsmen with the intent of sacrificing them to delay Paul's left wing. 

I rather botched my Cavalry deployment to the left of the wood!

This when I realised that Paul's left wing made of  Elite Almughavar medium spearmen were going to make short work of my delaying force. I did try to get at least one knight around to try and relieve them.

Although my right flank has started to crumble, my infantry are having some success, and my knights in the centre are about to make contact.

In this game my infantry performed well. One of my pike blocks has broken through the enemy line and I am up in most combats there. In the centre my knights are holding their own, but on my right the inherent weaknesses of my deployment have been ruthlessly exploited by Paul.

Outcome

A hard fought victory for Paul. If my right had been better thought through I might have managed a win!

Lessons Learnt

  • The balance of this army was much better.
  • The decision to try and hold up the Almughavar with the crossbows and swords was ill-advised!
  • The choice of Pikes seems to have paid off well.

ADLG - Game Report 29

Feudal French (182) vs Anglo Danish(180)

In preparation for the ADLG competition at Warfare I needed to decide what the composition of my Feudal French forces were going to be. Pete volunteered to allow me to try my first army iteration against him.

This first variant was heavy with knights, backed up by a lot of mediocre militia.

For the initial deployment I combined my infantry heavy command with their cavalry units on the right and the main knight command. Clearly my intention is to try to destroy the enemies right wing and move down the line.

The challenge as always is how to use the command points, if you can get them with a good command roll, and then of course how you use them with impetuous knights! I have decided to hold my infantry line back and to soften up the opposition with the bow and crossbows. So far the left flank attack seems to be proceeding as planned.

The centre unit of knights has come into contact, and the enemies select fyrd are moving to contact against my main line.

We have managed to engage the enemies left flank. I have decided to pull the knights back and to move them to support the centre knights who seem to be about to be in a world of pain.

My infantry line is starting to look very weak. One of the central group of knights has broken through but is weakened. Meanwhile although the left flank attack is okay, weak command and control and the difficulty of manoeuvring impetuous knights is proving a pain.

Although I was having success on the left, the losses in the infantry line have been my undoing, and the French are defeated.

Outcome

A defeat for the French

Lessons Learnt

  • Despite a failure to apply "Furious Charge" benefits in first round melees the losses in the centre were my undoing.
  • Lots of knights are fun, and breaking them into commands was sound, but they cost a lots and their impetuosity and unmaneuverability is a major drawback.
  • The main infantry line of mainly mediocre troops was weaker than I expected it to be.


Age of Eagles - Game Report 3

The Battle of Landshut 15 April 1809

Background

This is the second battle of the Danube 1809 Campaign.

Situation

The Austrian Army was committed to forcing crossings across the Isar River in order to engage and destroy piecemeal the French Corps south of the Danube before the had an opportunity to regroup. Early on the 15th April the advance guard of the 6th Armee Korps made up of HR and CLR3 secured the crossing and sent picquets forward to the outskirts of Landshut. Behind this advance guard the rest of the Corps were on the march and due to arrive around 1200hrs. The 2nd Reserve Korps was further behind them on the road.

The French had sent II Corps D’Armee with its 1st Division to contest the crossing supported by 3rd Hvy Cav Div. The II Corps’s 2nd Division was due to arrive around 1400hrs.

Battlefield Map and Terrain


The battlefield was open and flat with a number of small woods on the flood plain. The Heigel Stream ran west to east to the Isar River, effectively splitting the battlefield. With the unseasonably heavy rains the stream was discovered to be uncrossable for most of its length. This committed the Austrians to conducting a forced river crossing at the bridges.

The Action

The battle started at 1300hrs with the Austrian 6th Armee Korps arriving after crossing the Isar. The Corps Commanders plan was to send the Advance Guard Division to context the furthest west crossing while the 1st Division forced the crossing closest to Landshut, with the 2nd Division linking the two and capable of acting a reserve for both.

The French 1st Division was already well deployed to defend this crossing and therefore it was important to get the artillery into action as quickly as possible.

Unfortunately the movement of the Advance Guard was hampered by poor command and control and there were significant delays in moving of to their objective.

Space for deployment was at a premium for the Austrians. In trying to achieve fire superiority over the French artillery the Austrians were less than successful, suffering a wrecked battery in the process.

Despite this the Austrian Commander decided that he needed to press home the crossing and IR4 and IR59 formed column ready to charge across the bridge. 

Where they formed line to confront the French.

Initially the IR4 did well, but the French pressure proved to great and eventually both Austrian regiments were forced to withdraw back across the river. 

As this fight was taking place the French 2nd Division had arrived and moved to support the 1st Division. The firefight continued across the Heigel stream for most of the afternoon.

As dusk was starting to fall the Austrian advance Guard was approaching its objective but failed to come into contact with the French.

Outcome

Casualties were very light on both sides. The French withdrew Northwest after the battle leaving the Austrians in command of the battlefield.

ADLG - Game Report 181

Medieval Spanish (239) vs Order of St John (263) For the final battle of the competition I was facing Drakoulis’s noble Order of St John. A...