ADLG - Game Report 181

Medieval Spanish (239) vs Order of St John (263)

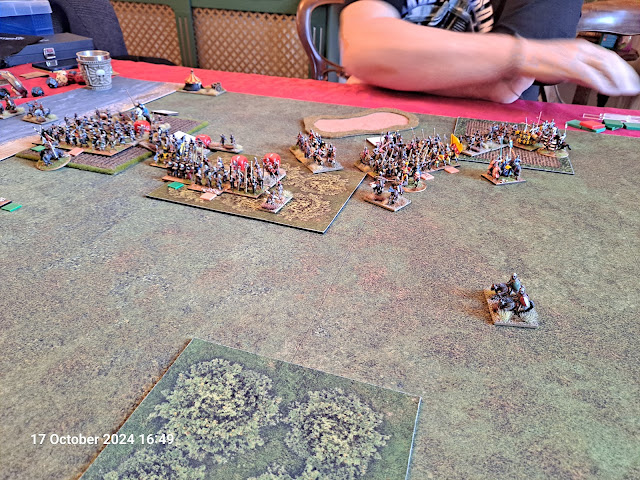
For the final battle of the competition I was facing Drakoulis’s noble Order of St John. And once again I was going to attack in the plains. The difficult terrain was all located on my left and hence that is where the Almogavar command was sent. There was an interesting and irritating marsh on the right next to a coastline, which I intended to patrol with my Jinettes.

This was a game of limited subtlety – just advance and give battle as quickly as we both could.

First into contact were the Almogavars over on the left. While the Knights faced off each other on the right.

On the left the Almogavars have turned the enemies left flank. However, on the Spanish right I have left my flank exposed and failed to bring the Jinettes up to protect the right flank of the Mercenary Knights.

Outcome

The Spanish won the day by inflicting 23 to receiving 21. This meant that I came away from the tournament with 2 wins, 2 losses and a draw, to finish as leader in the clubhouse from the usual Entoyment suspects.

Lessons Learnt

  • I should not have lost 21, and would not have done so if I had protected the Knights open right flank!
  • ADLG - Game Report 180

    Medieval Spanish (239) vs Medieval Scandinavians (251)

    Day two of the competition and I was facing another Medieval Scandinavian army led by Gordon. This time with a very different composition that which I faced against Iain! However, I was once again attacking, but this time in the Plains. I placed the Almogavars on the right in order to try and seize the village astride the road.

    The Scandies decided they didn’t like the look of my threats to their left flank and quickly moved forward to seal it off. Meanwhile they opened a wide gap in the centre with their right flank moving even further right.

    In response I moved the foot command to its right and wheeled left to conform to the movement of the Almogavars, which were sweeping around the right flank. On my left I decided to stall the enemy’s move to the right with the Light Cavalry while half of the Mercenary Knights moved forward to face off against the enemy knights.

    After considerable tactical manoeuvring on both sides the point of the battle is getting every closer. The Scandies have closed the gap and have brought both of their foot commands together in a more coherent line for me to break through. In the centre my Halberdiers have passed through the crossbows to be ready to engage the Knights. The Almogavars are now in close support. The Knights are suffering again from the ravages of crossbow bolts fired against them!

    The Scandie Knights have been destroyed, leaving the path free for the Spanish foot and Almogavars to move forward to engage the enemy left flank.

    In spite of a number of losses the Spanish foot are advancing well and the Almogavars are poised to contribute to rolling up the enemy line from my right.

    Outcome

    Unfortunately, we timed out with me needing just three more cohesion hits for a victory. It ended with a draw with me inflicting 23 of 26 hits and only receiving 12 in return. At this stage in the competition I was standing at 2 losses, 1 draw and 1 win.

    Lessons Learnt

  • In this game the tactic of passing the Halberdiers through the crossbows worked very well indeed!
  • The slow advance of the Almogavars was due to poor command and control, perhaps that General if he is on the flank should be better than ordinary?
  • ADLG - Game Report 179

    Medieval Spanish (239) vs Medieval Scandinavians (251)

    As I fall down the league table with two losses, my next opponent was an old friend and army I have fought before; Iain’s Scandinavians. I was rewarded for my efforts with the benefit of attacking in the forest. I deployed up with the Almogavars on the left ready to advance through the brush and woods while the infantry command protected the flank, with the Knights looking for something to do on the right.

    The Scandie’s primary tactical problem, with their decision to defend between the gully and steep hill to the forest, was to extricate their cavalry on the right, so they formed a caracole in their move to the rear. Meanwhile we advanced in the centre to conduct an infantry battle against the massed ranks of polearmed Scandie infantry.

    Both sides mounted troops are being held in reserve, as the infantry lines close up to engage each other.

    Battle is joined, and the Scandie Polearms manage to chew up a lot of the spears of the Spanish infantry.

    Both sides trade hits along the line with gaps appearing that both sides want to exploit.

    In spite of the many wounds they have suffered the Spanish foot are holding their own and creating more gaps. Both sides Cavalry are standing ready to exploit any holes in the line.

    The Spanish foot have finally broken through the Scandie line, with only two polearmed units trying to stem the flood of Spanish foot.

    Outcome

    A Spanish victory by 22 to 11, and finally a win on the board.

    Lessons Learnt

  • Most of the lessons in this battle were for Iain.
  • ADLG - Game Report 178

    Medieval Spanish (239) vs Medieval Scots (232)

    On to the second Warfare game to try and redeem the situation, and to move up the ladder, against Andy’s Medieval Scots. Here I found myself defending in the Plains against a Pike equipped infantry army. At least I put the Knights on the correct flank against the Scottish nobility.

    The Scots decided to defend the gully on the left, and advance in the centre with their Pikes. For my part we advanced in line to give combat. However, this time the right of the line of knights has started to succumb to the crossbow bolts.

    As the Scots command and control starts to improve, they bring more Pikes into line. Meanwhile I studiously avoid any notion of engaging the Pikes with my Knights, and instead advance my infantry forward. Although the end Knight succumbs even further to crossbow bolts.

    With the advance of the Scots Knights I have brought my own forward to confront them. Whilst withdrawing the damaged Knight from the line of battle. In the centre the Infantry are ready for battle against the Pikes.

    From the colours along the line it is self-evident that the combats have not gone the way of the Spanish. That is apart from the Halberdiers on the left end of the line who have destroyed a foot knight unit.

    Against the odds the Mercenary Knights have prevailed against the flower of the Scots nobility! The same cannot be said about the Infantry which have failed to inflict any significant damage on the Scots Pikes. The Almogavars have moved forward to contest the gully and suffered the consequence so their rash action.

    Outcome

    A Scots win by 23 to 17. A result that was much better than I expected despite the loss.

    Lessons Learnt

  • I should have committed the Almogavars much sooner!
  • ADLG - Game Report 177

    Medieval Spanish (239) vs Kingdom of Sicily (188)

    On to Warfare 2024, where I decided in the end to go with the Medieval Spanish. As a precursor operation I printed of some Medieval Spearmen to create some Almogavars! Printing armies on demand, or at least printing to supplement my existing armies. After some consideration I decided to deploy an included commander with the Mercenary Heavy Knights.

    First battle was against Mike’s Kingdom of Sicily, where I found myself defending in the mountains. I placed the Almogavars on the left on a hill (out picture on the left on the other side of some impassable terrain), Infantry in the centre with the Knights out on the right.

    The Sicilian’s decided that they needed to make a move to their left as they didn’t fancy trying to deal with the Almogavars on the hill; nor would I if I had been in their shoes!

    I moved forward echeloned to the right to close the room for manoeuvre for the Sicilians.

    With the enemy concentrating on the left I decided it was time to bring forward the Almogavars, to protect my left flank. In retrospect it left this probably a turn or two later than I should have. I have at least withdrawn the Jinettes (Light Cavalry) through the Knights taking them out of the line of battle.

    Enemy crossbows have started to generate fire for effect on the Knights (a theme for the weekend).

    As more crossbow bolts pummel the unfortunate knight on the left end of the line, the enemy lights are attacking my exposed right flank which has only the Jinettes to protect the right flank of the knights.

    The mercenary Knights have not fared well. The Knight wounded by the crossbow bolts died very easily but so did those on the right of the line. Elsewhere the infantry are moving forward to engage the Sicilians.

    The enemy have exploited their breakthroughs and are now rolling up the remainder of the Knights. Elsewhere the infantry combats are not going as well as one would have liked either!

    Outcome

    A win for the Kingdom of Sicily by 13 losses to 23.

    Lessons Learnt

  • Terrain doesn’t protect your flank unless you occupy it!
  • ADLG - Game Report 176

    Medieval Spanish (239) vs Catalan Company (262)

    Given the broadly positive outcome with the Medieval Spanish, I decided they needed another outing. This time against Paul’s Catalans, and in which he decided to let me attack, and with the dice gods on his side he moved my plantation from behind the field on the left by the coast to the centre. A much more defensive battlefield for his Catalans. I formed up with the Almogavars on the left to contest the field with the spears in the centre and the Knights out on the right.

    There was a whole lot of manoeuvring to get the troops from both sides where we wanted them. For me It involved splitting he spears either side of the plantation. Importantly it allowed me to bring the armoured polearms up in support of the Almogavars to protect their flank. While the remainder of the spearmen moved to the right of the plantation to support the Knights.

    As the Knights moved forward they started to receive severe crossbow fire. In the centre the Spanish crossbows attached to the spearmen are moving to the centre to context the plantation with the enemy lights. While on the left the opposing Almogavars try to stare each other down!

    The crossbows have entered the wood to context it, all that is left to support them is a lone heavy spearmen which might need to be committed to the fray. On the right the Knights are chasing down the enemy light cavalry while they try to turn the enemies left flank.

    On the right the enemy left wing has withdrawn in the face of the advance of the Knights, who are now one less in number after one of their units was destroyed by crossbow fire. The heavy spearmen have fixed the enemy cavalry in place. However, in the plantation one of the Spanish crossbows was destroyed in combat by the combined effects of the enemy light troops.

    And in a competition game it is there that the game might have ended. All along the line, however, the combat factors were even in the important contacts between the opposing Almogavars, and between the heavy spearmen and the Catalan cavalry. I decided to roll the dice, only to win only one of the seven even combats, and in one to lose six to one!

    Outcome

    A win for the Catalans on my throw of the dice by 9 to 22.

    Lessons Learnt

  • Would I, should I, risk the throw of the dice in so many even combats in a competition?
  • It certainly makes life interesting when one does decide to roll the dice!
  • A decision is needed on whether to go with the Flemish or the Medieval Spanish for Warfare.
  • ADLG - Game Report 175

    Medieval Spanish (239) vs Mongol Empire (229)

    Back from the Old Codgers event it was now to start planning for Warfare. And of course the woeful decision about which army to create and/or take. On a careful reading of the lists I decided to try out he Medieval Aragonese Spanish. A nice thing about this army compared to the usual Flemish army is that the medium troops are better than the Flemish have; well the Almogavars are better than most medium troops. An important consideration given the amount of difficult terrain some people deploy, including me!

    Kevin was up for the fight and brought along his Mongol Empire and the Khan’s guard. I was asked to defend and deployed with the Almogavars on the left to try and move forward and disable to the Mongol heavy artillery. Meanwhile the heavy spearmen command provided flank support to the Heavy impact knights who were going to go barrelling through the centre, if possible. The gap between the plantation and the field was exactly the width of the knights!

    The crossbows provided excellent support to the Almogavars on their left, although given the opportunity to pursue the enemy rigorously when they evaded, the Almogavars conspired against me to be on a go slow! In the centre and the right the question would be the speed or otherwise as to whether I could drive the Mongol horse archers of the table. Having said that the flank fire from the artillery has already severely damaged the armoured polearms at the end of the infantry line – when would they run out of ammunition?

    On the left the Almogavars continue their relentless, albeit slow, pursuit, which is bringing the enemy artillery into range of them. Actually not before time as despite a successful rally the armoured polearms are now looking increasingly fragile and sick. 

    The Almogavars have overrun the artillery, but not before they finished of the polearm unit with fire, and are now mopping up the levy that was protecting the artillery. They would have been better employed destroying the enemy cavalry! The Knights have been forced to commit themselves into pursuing across the field. However the gap provides for the infantry to more completely provide flank support.

    Eventually the Khan’s guard turn to fight on the right. However, a cardinal error is made by the Knights as they allowed the enemy cavalry to engage them while they were leaving the field, and subsequently destroyed them (now where and when did I commit that error before?) On the left the Almogavars have regrouped after destroying the artillery pieces. They are now engaging the final expendable levy who do not seem to want to be expendable for the good of the cause!

    Outcome

    An incredibly close call and a game which went into the final turn, with the Mongols coming out on top 22 to 21.

    Lessons Learnt (or re-learnt)

  • In the terrain or out of the terrain not half-and-half.
  • What is the plan B if you can’t move pursue fast enough to keep the pressure on?
  • Bolt Action - Game Report 36

    The Invasion of Hungary Sep 1944

    Introduction

    After a surfeit of ADLG Paul and I decided to continue the momentum of learning the new Bolt Action V3 rules by having a game at Entoyment. It would also help us see how much we had learnt from the experience of the recent Bolt Action V3 event at which we had both played. We threw (not literally) some terrain on the table and started to roll the dice for the scenario and battle. We mutually decided that we wouldn’t play the Fog-Of-war option. In the event it was a simple meeting engagement deployed along the long table edge.

    Situation

    At the beginning of Sep the General Malinovsky’s 2nd Ukrainian Front’s supporting attacks in the southern Carpathian mountains to the 3rd Ukrainian Front’s offensive against Belgrade had failed to break through in to Hungary. Subsequently Stavka directed that Malinkovsy use his 46th Army to launch an attach from the Arad salient to encircle Debrecen.

    As a prelude to this operation mobile columns were created to drive forward to seek intelligence through aggressive action seeking for weak points in the enemy defences. The Hungarians were skilled in preventing deep penetrations of their lines preventing the deep attack methods that had been successful previously against the Axis forces. The 476th Rifle Regiment of the 320th Rifle Division were given the honour of leading the mobile column from the 37th Rifle Corps.

    The Commander of the 476th Rifle Regiment deployed a strong combat reconnaissance patrol to lead the advance guard and to find and fix the enemy to allow him to manoeuvre the Advance Guard to bypass any opposition that could then be dealt with by follow on forces from the rest of the Division.

    Enemy Forces

    Intelligence was limited. It was known that the Hungarian army had regrouped and reconstituted its forces after the debacle they had suffered after Operation Saturn in 1943. Additionally there motivation was high as they were now defending their own territory. Aerial reconnaissance had indicated that there was enemy armour on the line of advance but its strength and type was unknown.

    Friendly Forces

    Junior Lieutenant Feodor Asimov was given command of the combat recon patrol. He had under his command his own platoon of 3 rifle squads, and an additional SMG squad along with an anti tank rifle team and a sniper. He was accompanied by a Mortar section of two 82mm tubes, a Forward observer. Operating on his line of advance and in support was a recon patrol of a T70 and BA-10 from the 30th Cavalry Division.

    Mission

    The 476th Rifle Regiment’s Combat Patrol under Lt Azimov is to drive forward and engage and fix the enemy in place to allow the Regiment to manoeuvre and to penetrate the enemy’s first line of defences.

    Post Mission Report

    Without the benefit of being able to infiltrate the enemy’s position Lt Azimov deployed a wide formation keeping his three rifle sections in line abreast . The mortar section deployed in cover ready to provide supporting fire. The FOO managed to find a good location on the left flank to be able to provide supporting fire when he detected a suitable target.

    Azimov decided to move around the left flank. The right of his three sections took fire and casualties but pressed on in support. The other two sections regrouped around the hill on the left to provide a base of fire against the enemy advancing through the woods to their front.

    The enemy brough direct fire against the mortars and reduced the firepower available, but not before they were able to range in on their targets. The sniper moved into overwatch to the right of the mortars.

    The timely arrival of the armoured recon managed to provide some essential fire support. Despite continuing to receive fire the mortar section continued to provide good fire support.

    A counterattack by enemy armour manoeuvring around our right flank was countered by some excellent gunnery from Junior Sergeant Afanseeva commanding the BA-10 armoured car.

    Junior Sergeant Afanseeva continued his advance using his machine guns to suppress the enemy infantry. 

    The enemy had moved forward to occupy the village, in doing so they brought severe fire down on the right-hand rifle section. However, the enemy were spotted by the FOO who brought in a fire strike from the Divisional artillery regiment that destroyed the building and the occupants, along with supporting elements. The reserve SMG section was rushed forward to try and secure the ruins in the village.

    A further counterattack by enemy armour this time against the left flank left the left section severely depleted. Despite the success they had had driving the enemy out of the wood to their front.

    Brave and potentially foolish actions by the enemy rocket team brought the T70 under fire and destroyed it.

    Outcome

    Despite the initial success of the Soviet advance, and the effectiveness of the artillery in support, the Hungarians managed to recover much of their losses and forced a draw!

    Honours and Awards

  • Junior Sergeant Afanseeva was awarded The Medal for Courage for his skilled gunnery and aggressive actions.
  • Artillery Lieutenant Oleg Frederovich was commended by the Divisional Commander Col. Yosif Zakarovich Burik for his skilful artillery direction and for saving the combat patrol from destruction.
  • ADLG - Game Report 181

    Medieval Spanish (239) vs Order of St John (263) For the final battle of the competition I was facing Drakoulis’s noble Order of St John. A...